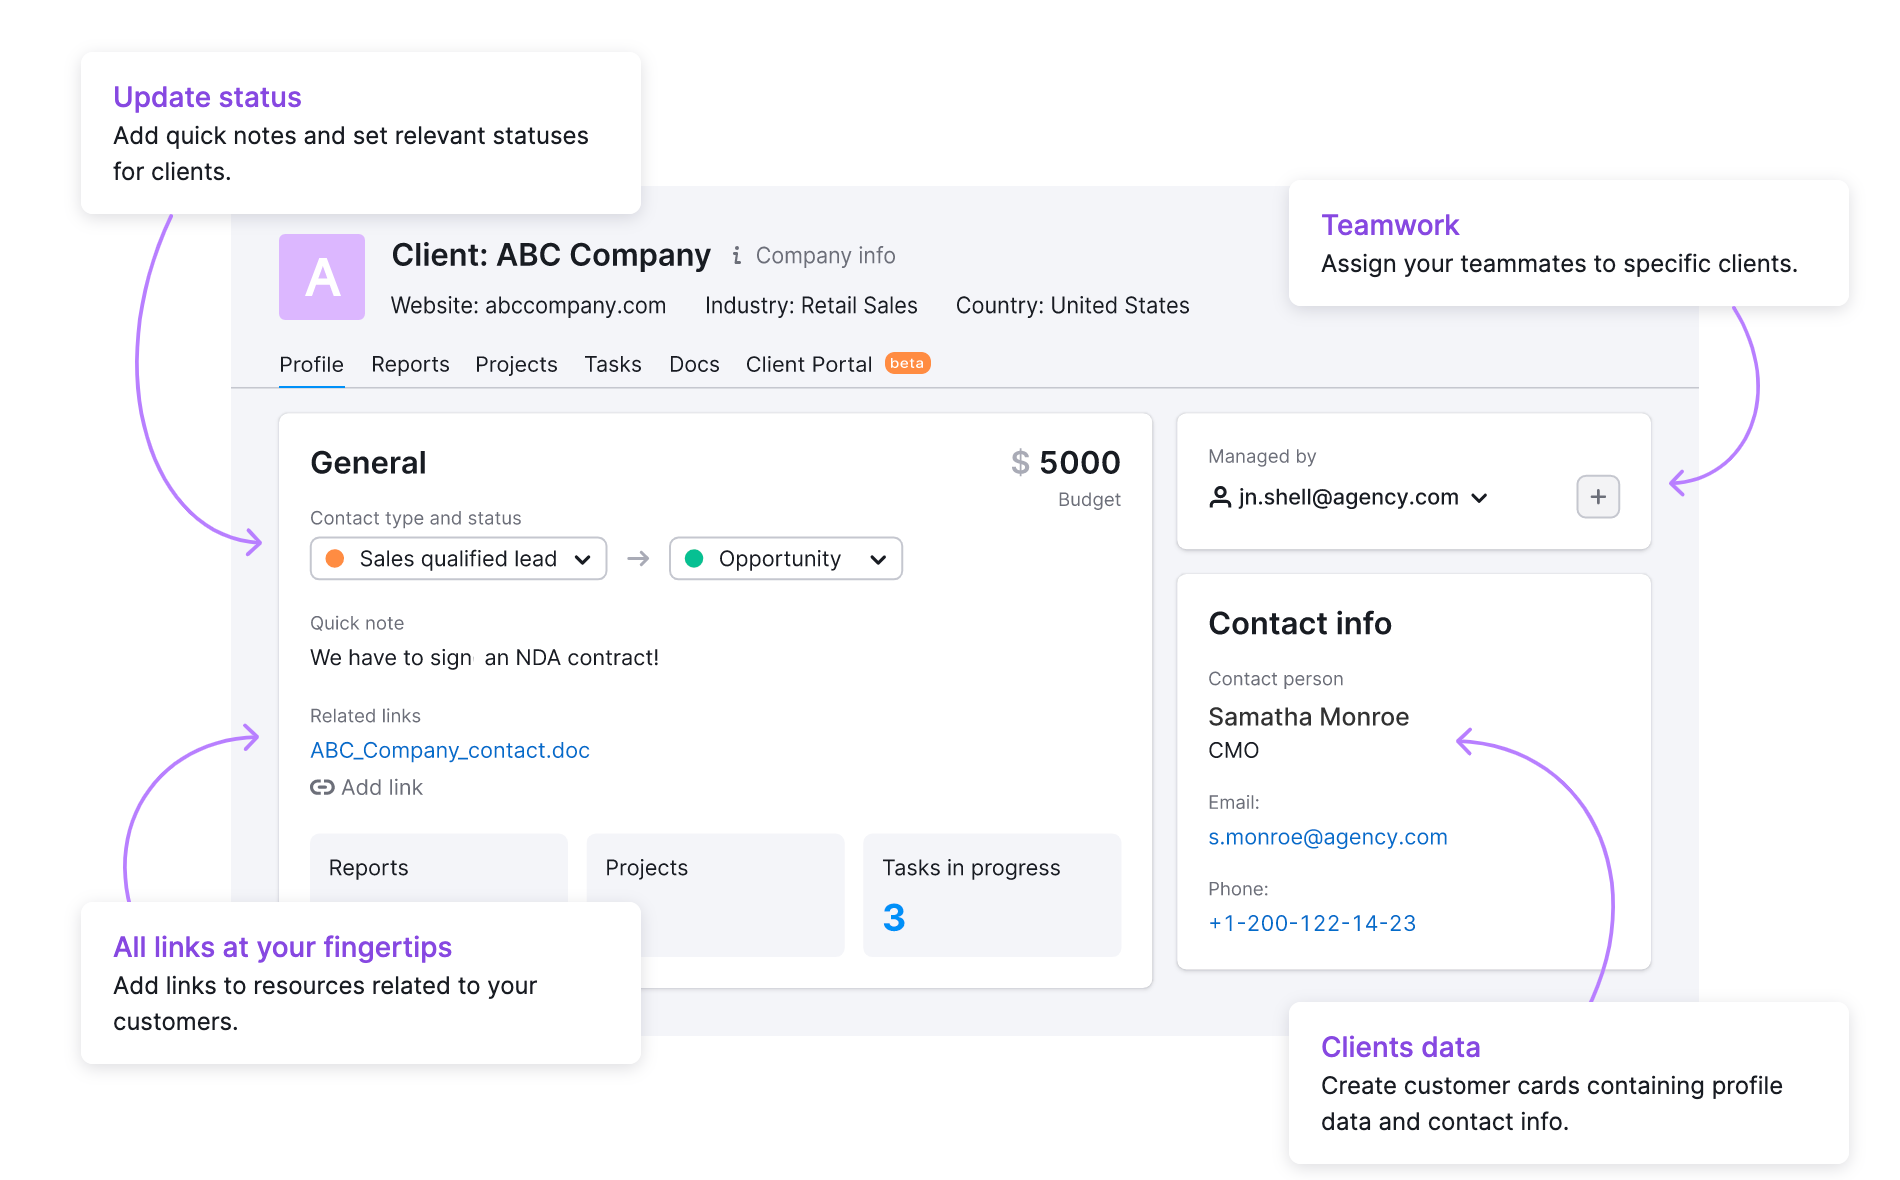
Semrush CRM is a dedicated CRM for digital marketing agencies, freelancers, and consultants that allows to work easily and efficiently with multiple clients. It enables you to:
- Get enriched data on prospects and leads and evaluate them in greater depth
- Maintain and organize key customer information, such as contact details, budgets, and statuses
- Effectively set and manage client tasks
- Track multiple Semrush projects for a specific client
- Create Client Portals for closer collaboration with clients
- Quickly collect data and create engaging PDF pitches and reports
Note that CRM is free, although some features in the tool require the Agency Growth Kit add-on.
To add your first client, go to the tool and:
- Fill in your client's domain name
- Click the green button

From there, you will be taken to the customer profile and prompted to enter your client’s website, contact type, status, and budget.
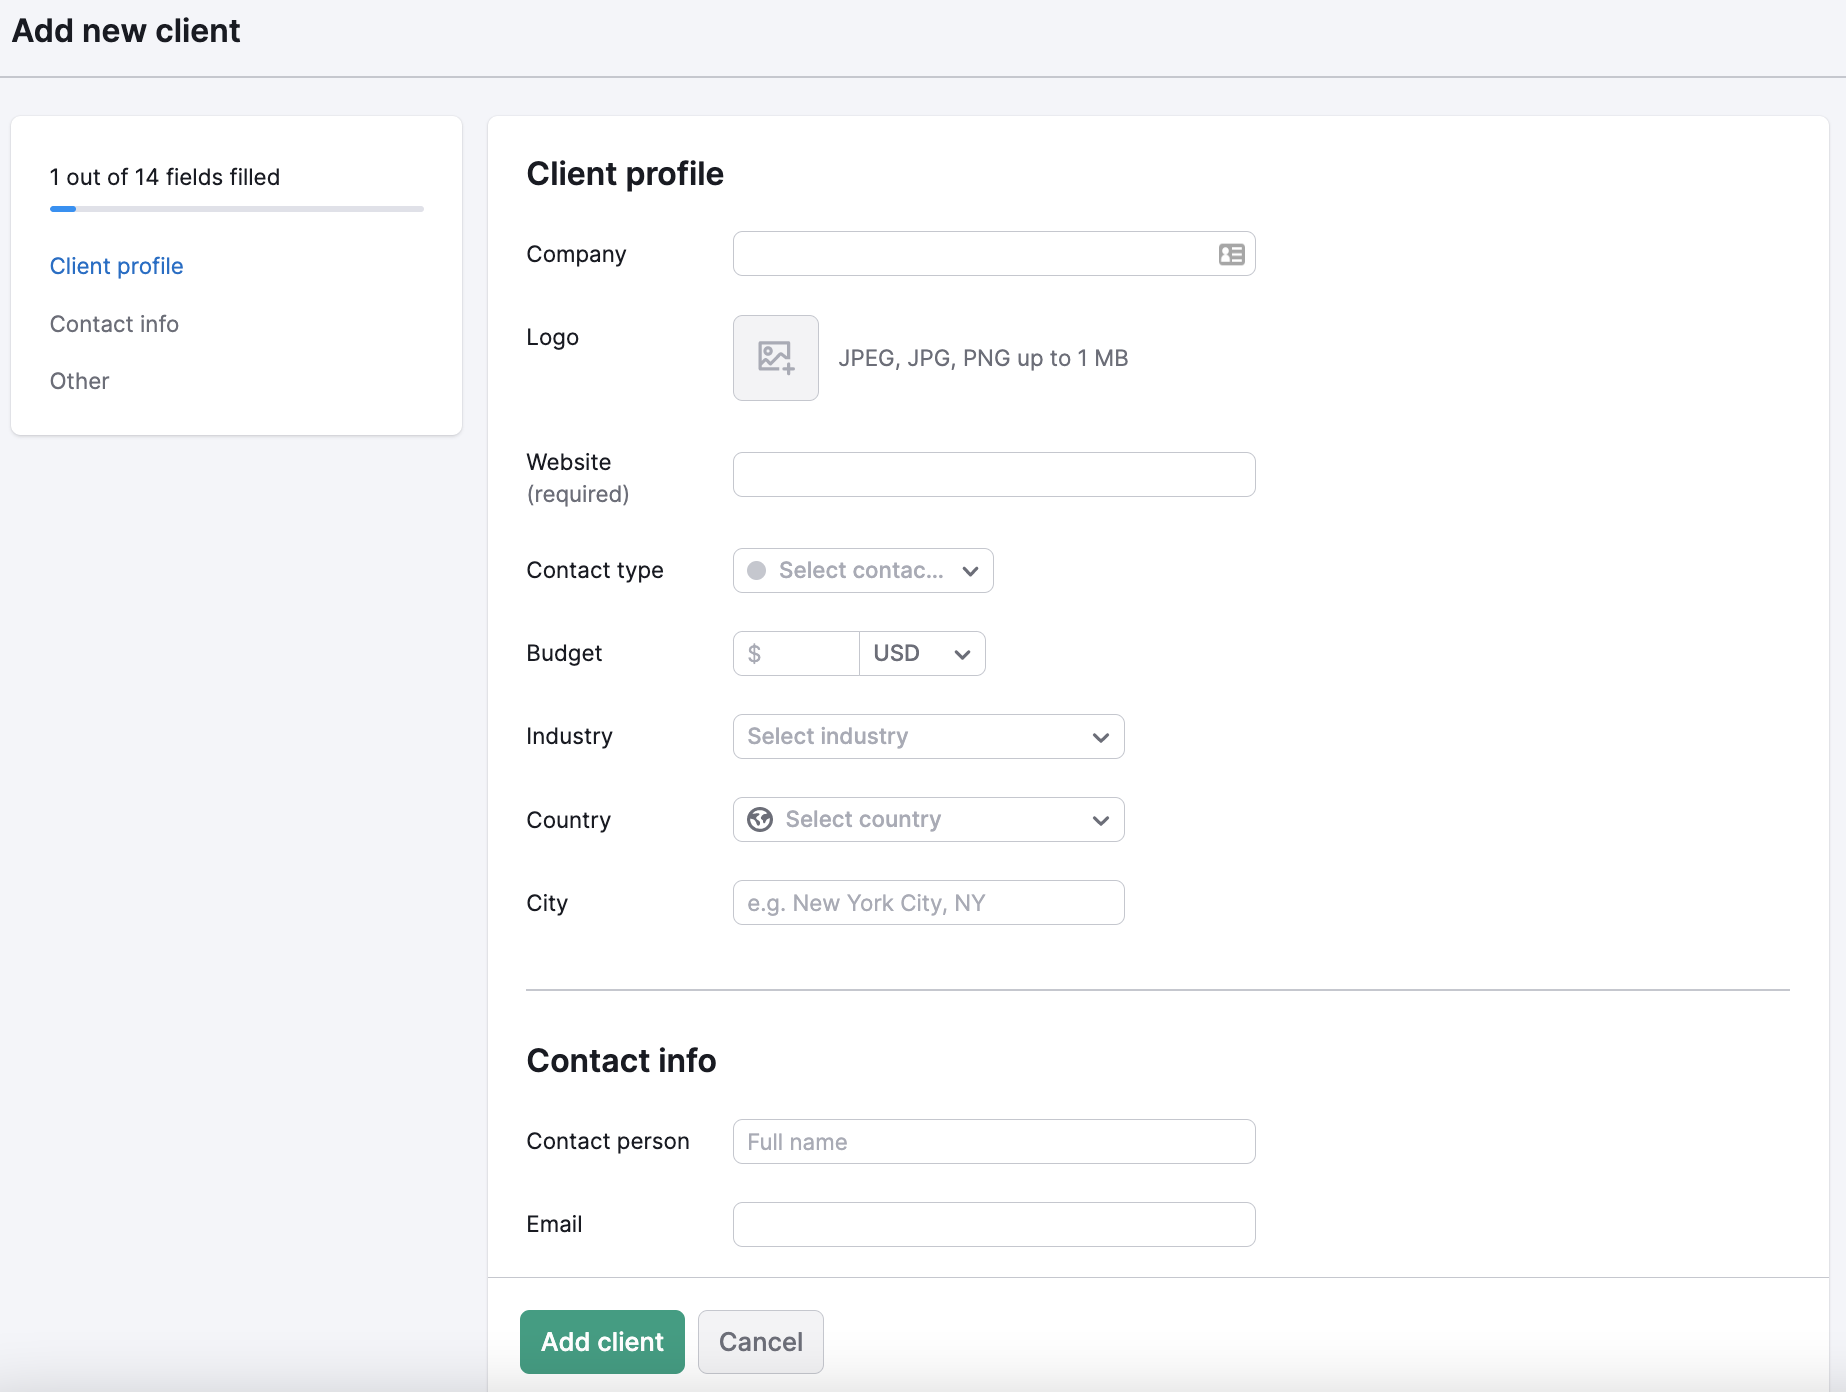
If you have any specific notes about a client, you can add them in the notes section at the bottom. You can also add related links to your client’s profile to keep all the information you need in one place.
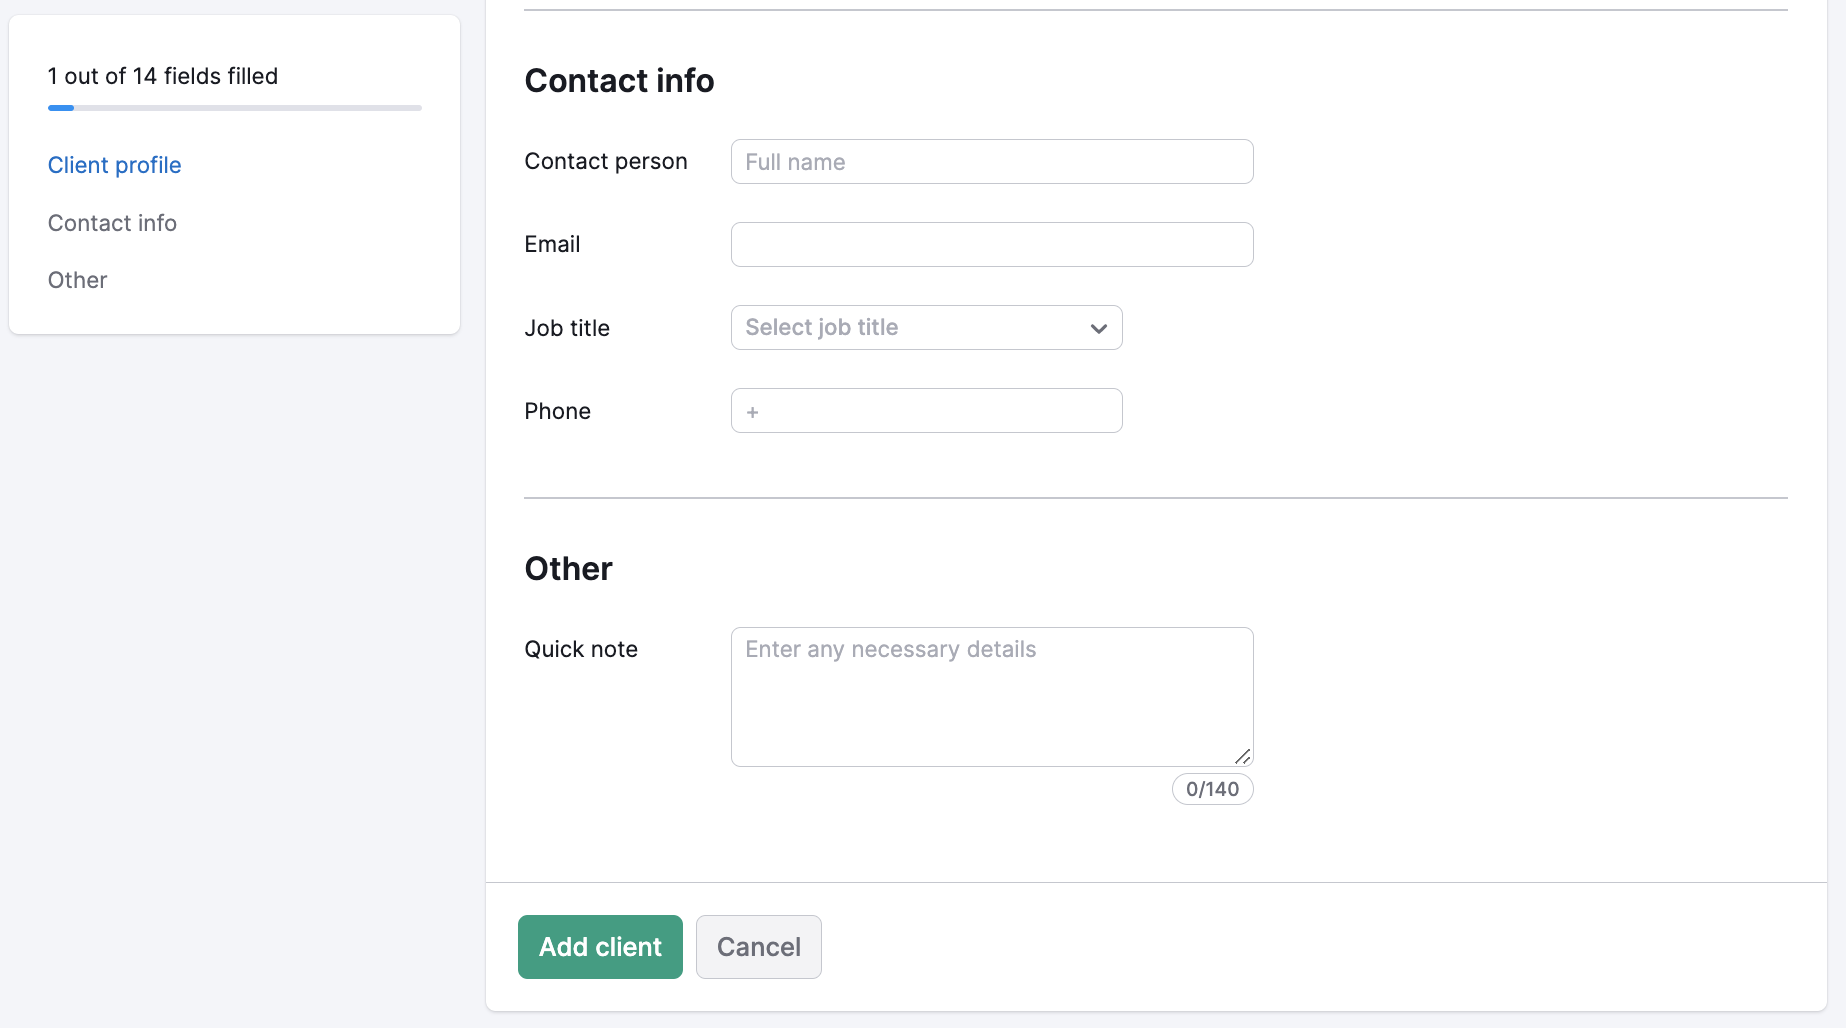
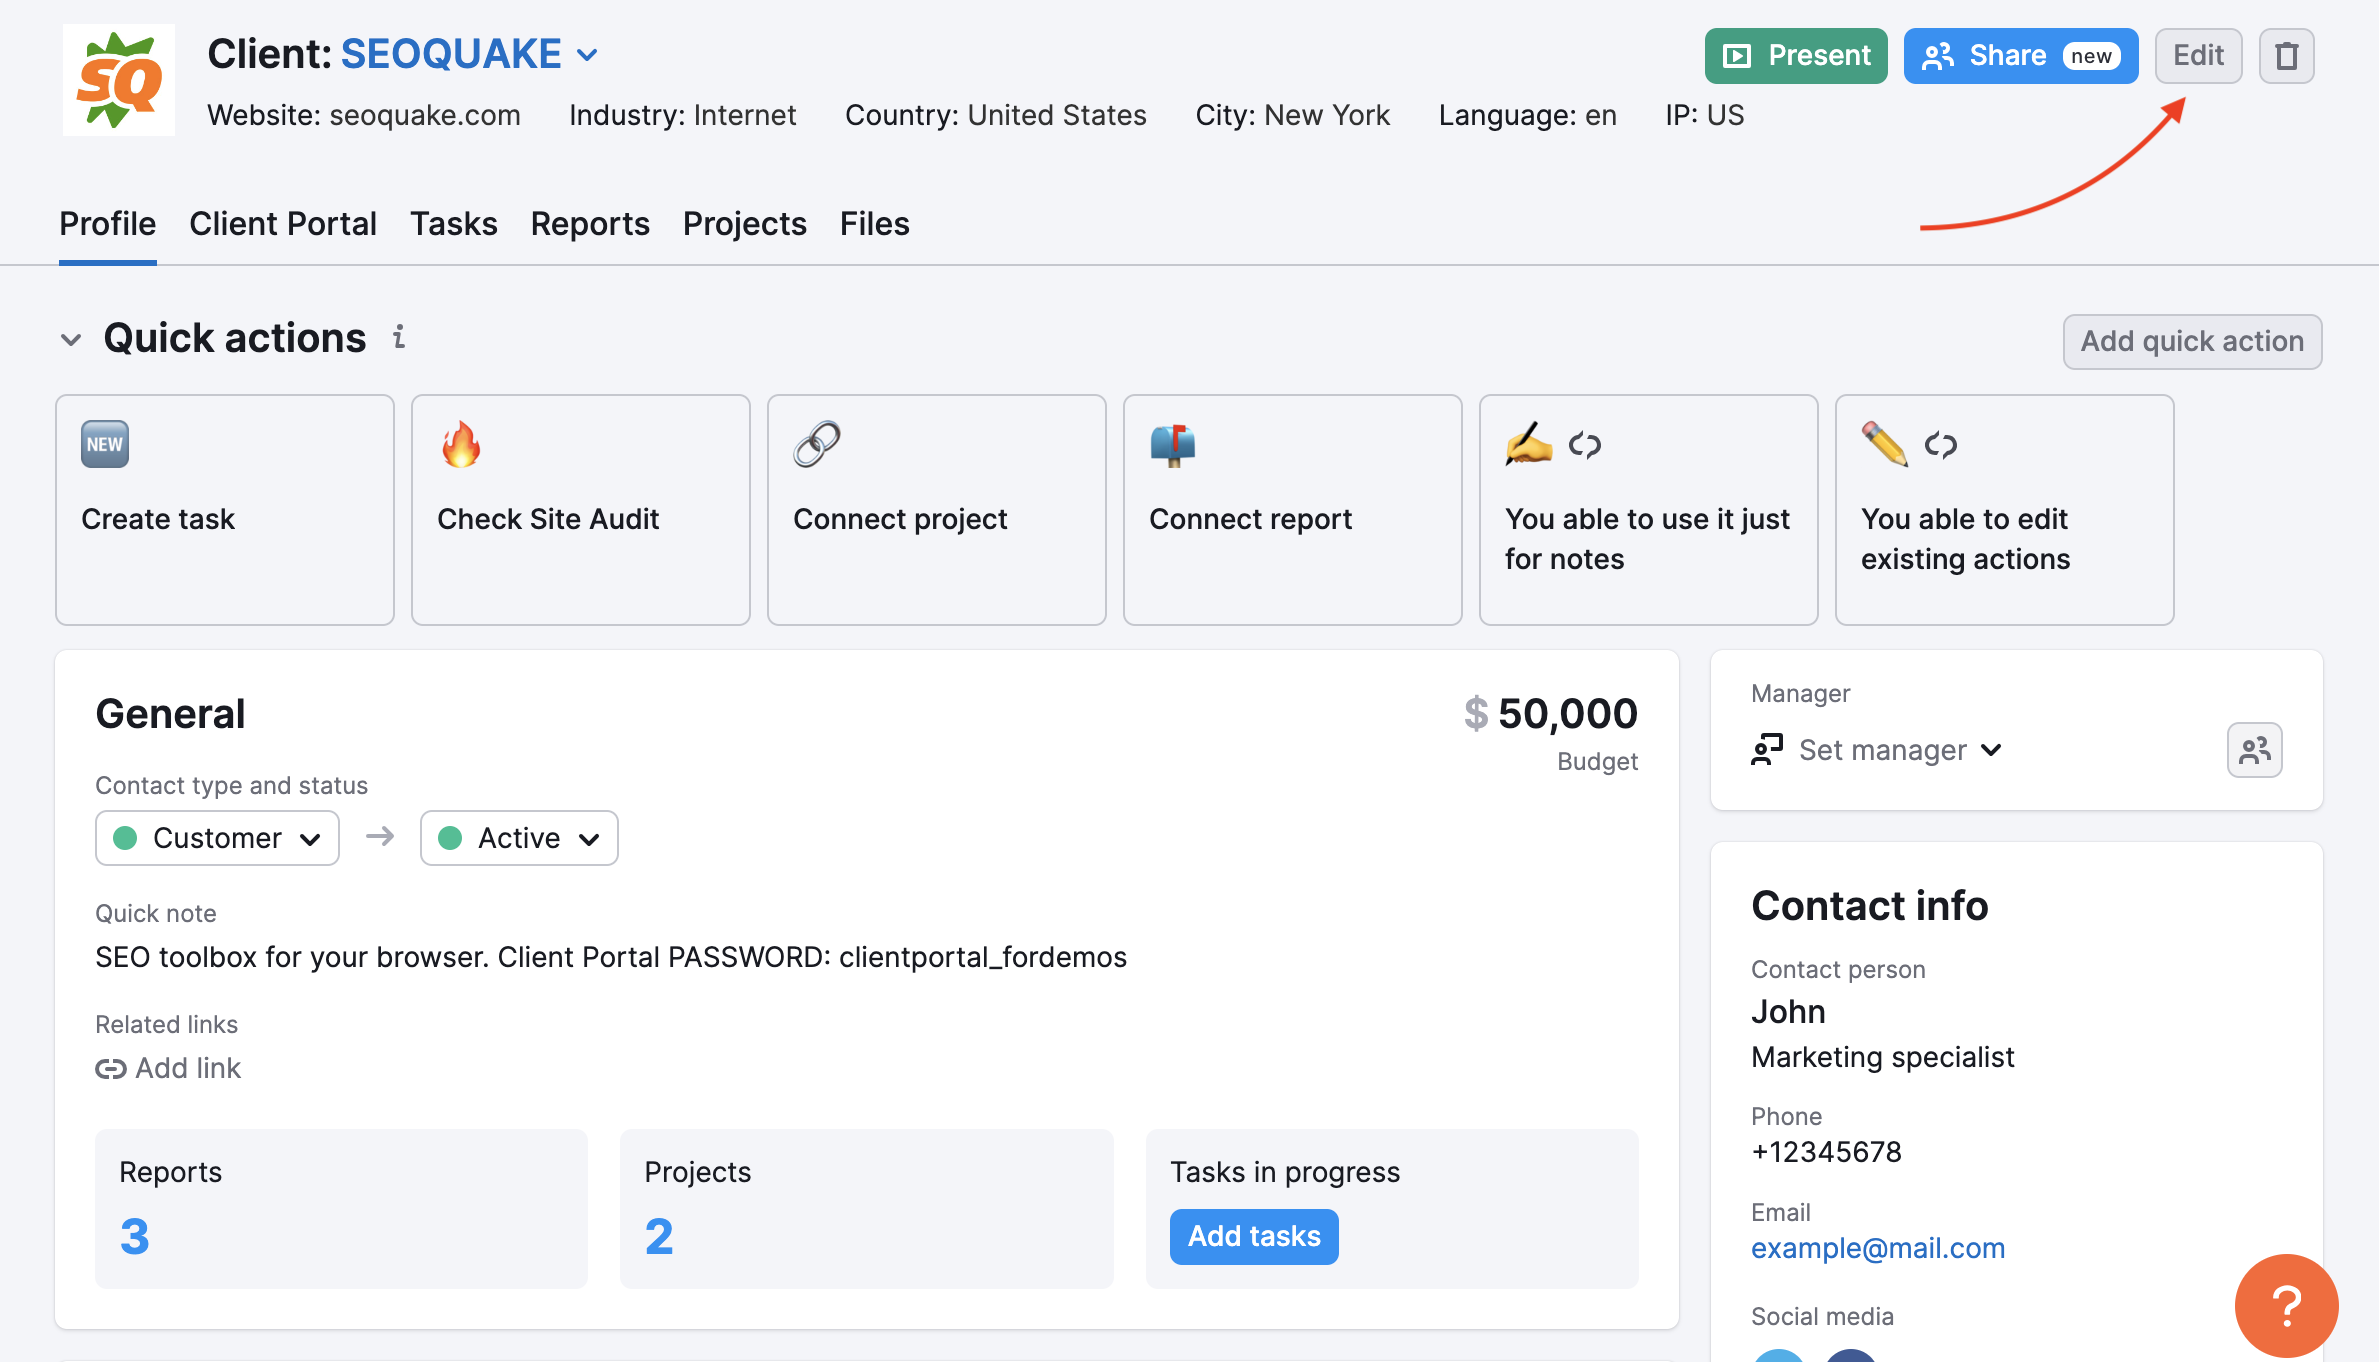
To add more information, such as industry, country, city, and contact person’s details, click “Edit” to open the full profile.
You can also add clients by importing them directly from your Semrush projects. On the main dashboard, just click “Import clients” in the top right corner of the page and the tool will automatically create the related client profile(s).
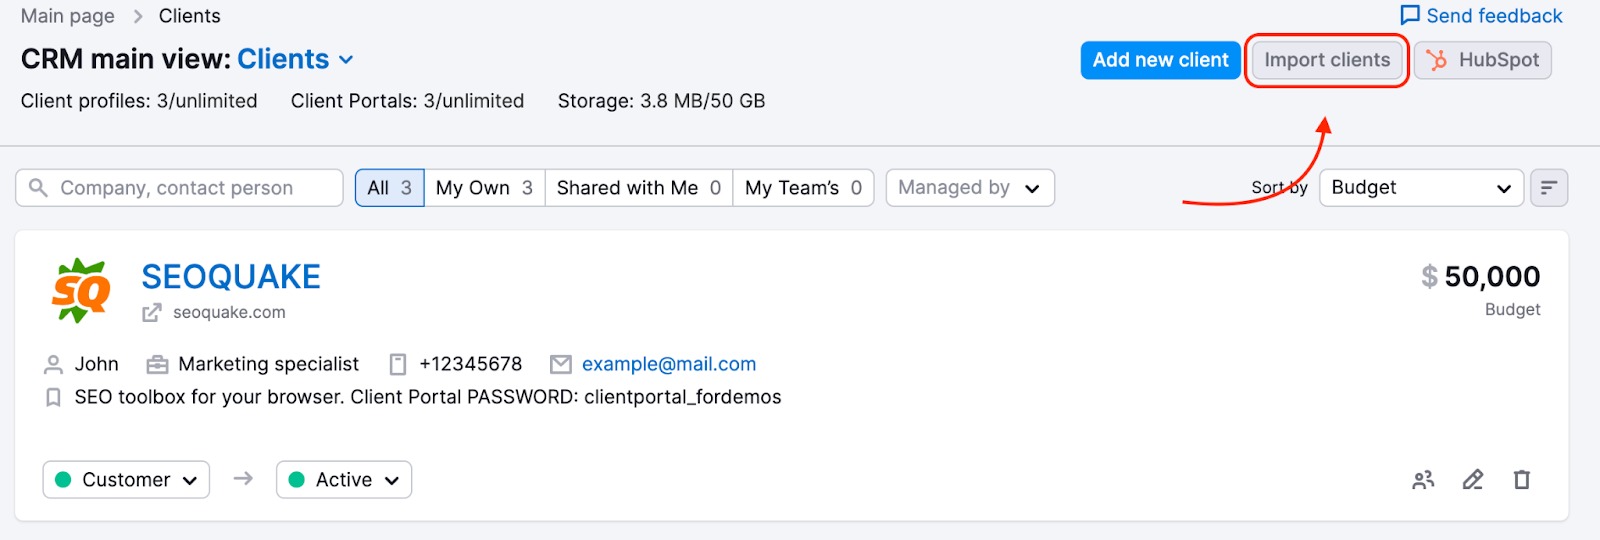
You can create up to 10 client cards for free. Increased limits are available with the Agency Growth Kit add-on.
Moreover, if you are listed on the Agency Partners Platform, you can add a prospective client straight to your list in Semrush CRM by clicking the “Add to CRM” button, so you can easily start managing your lead's project.

The "Quick actions" at the top of the client profile will help you get oriented with the tool navigation, tabs, and product functions. Use this for shortcuts to create a task (via the “Add quick action” button), create a task from a template, create a report, connect a report, create a project, or connect a project.
You can edit already existing tasks, and if you share a client with your teammates, they will be able to benefit from these quick actions as well.

Also, you can create a CRM client, a Client Portal, and attach the report to this Client Portal with just a few clicks in My Reports.

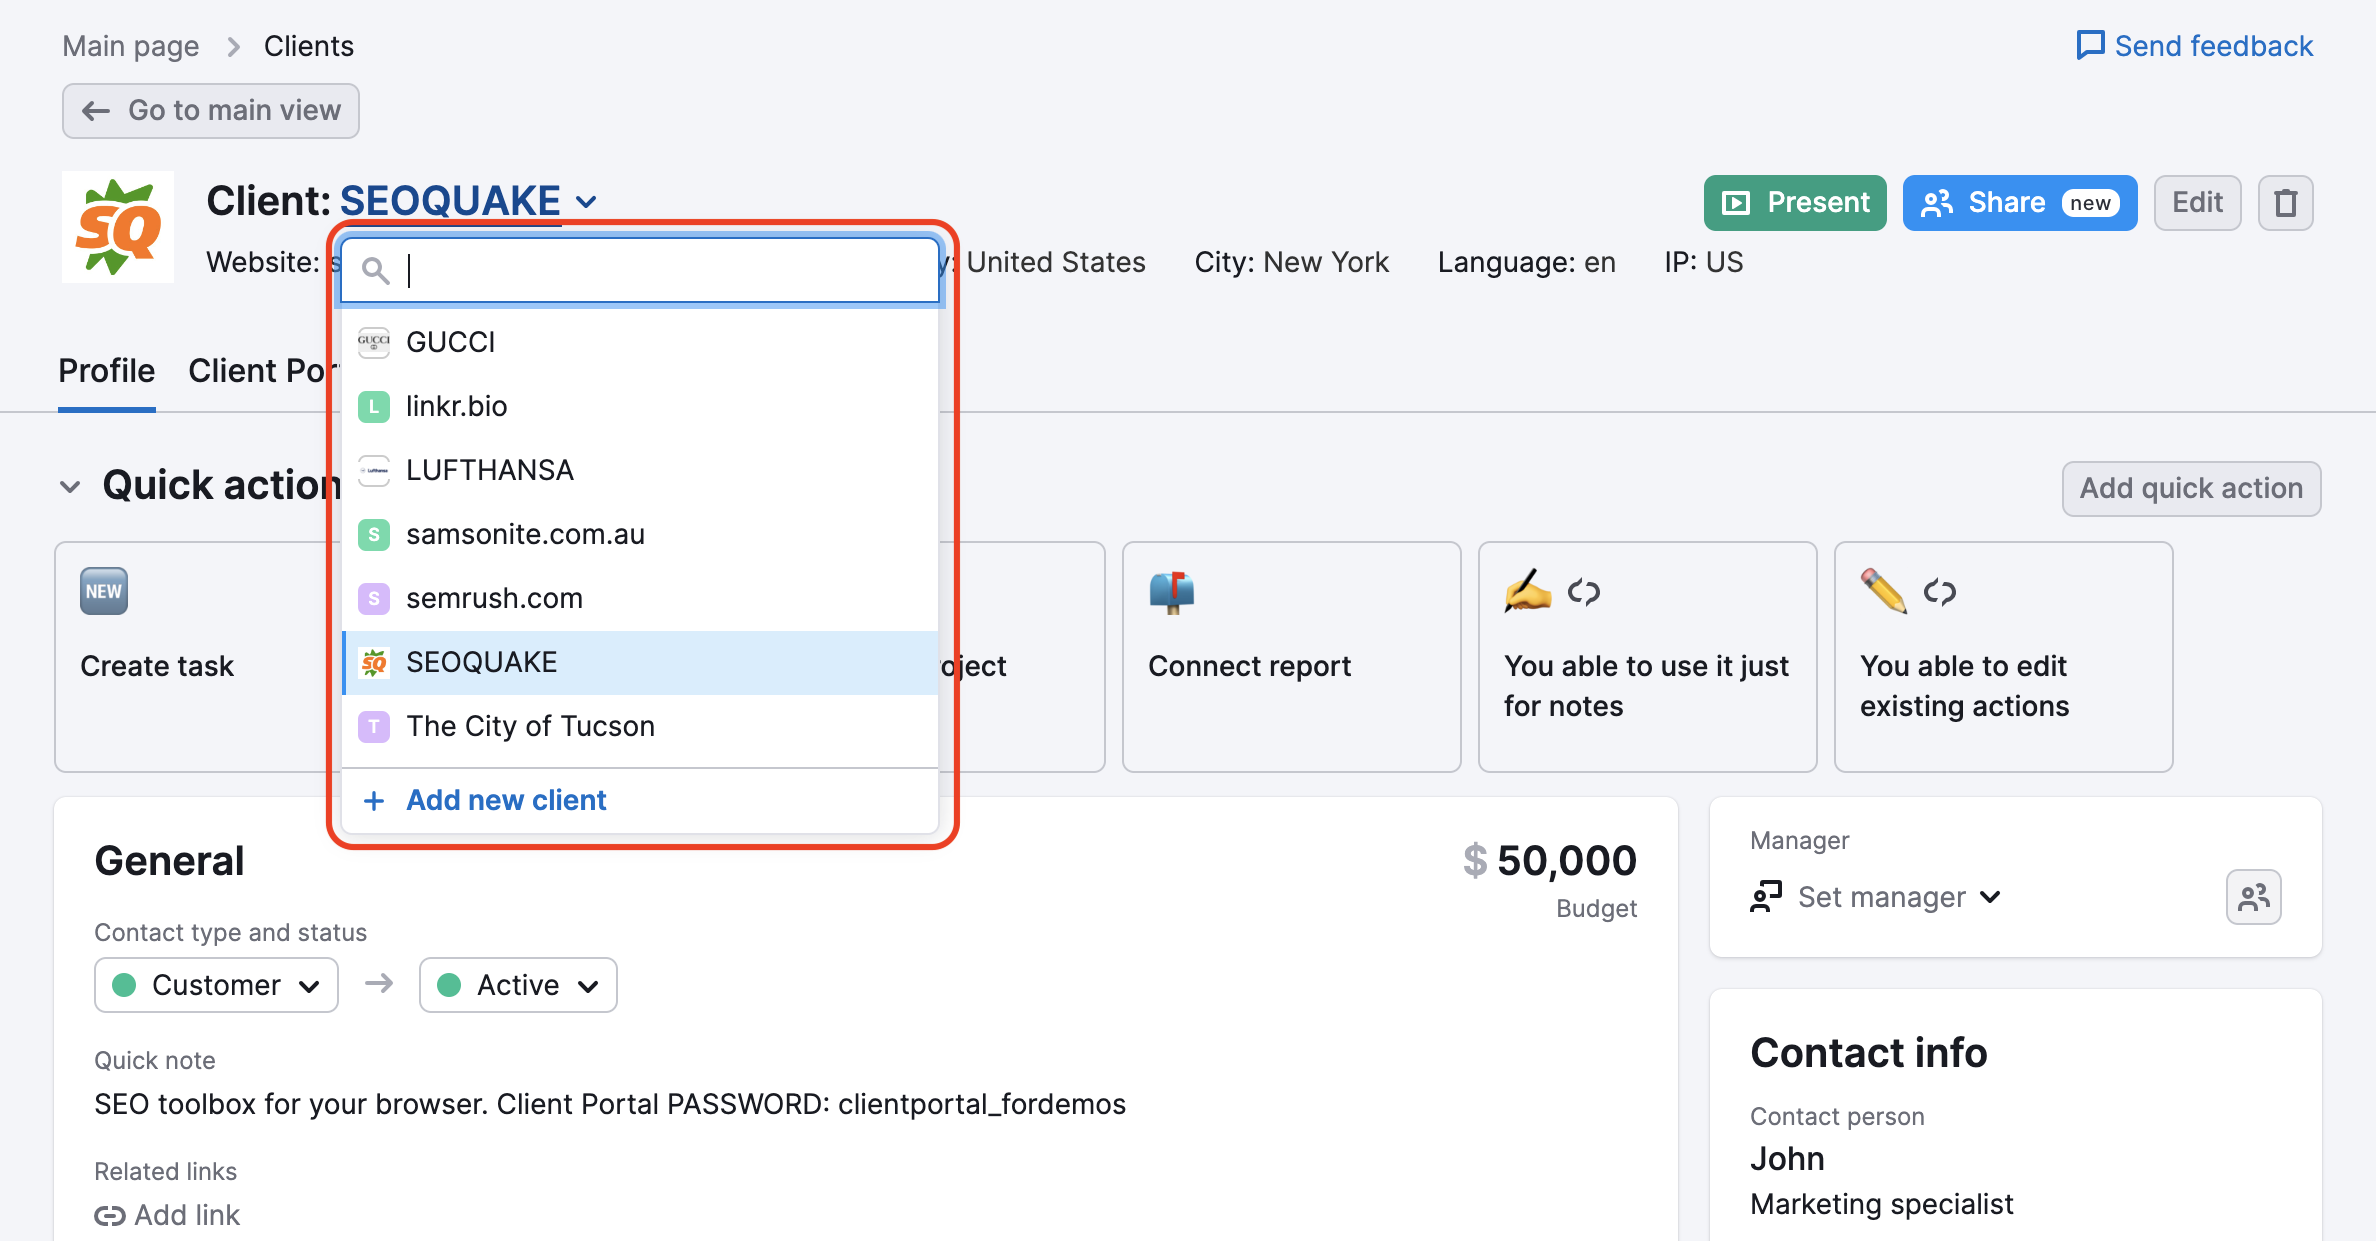
Additionally, you can switch between the clients and add new clients by selecting the corresponding option in the drop-down:
Once you’ve entered your clients’ information, you can begin to connect them with Semrush reports and projects. You can create new reports or projects or connect clients with existing ones.
To do this, click “Go to Reports” and select either the “Create new report” or the “Connect reports” option.
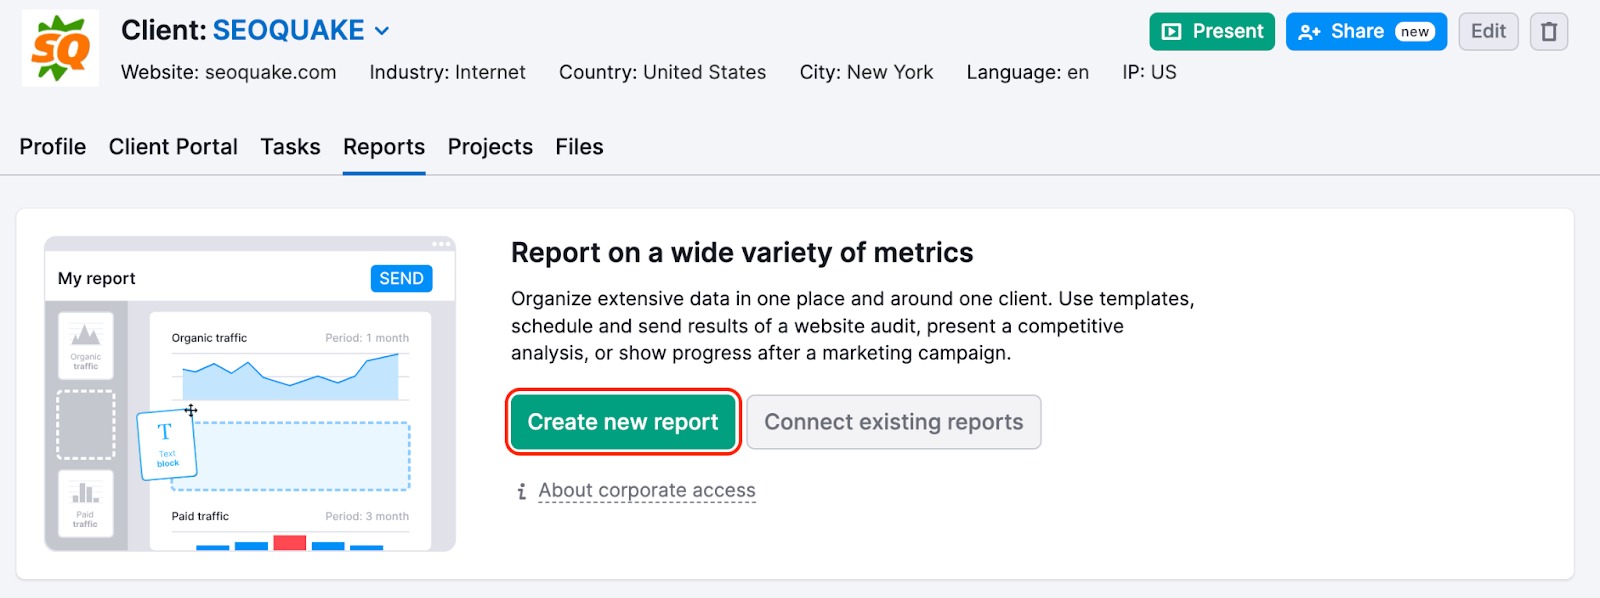
If you don’t have projects or reports set up for that client’s domain, you will need to create new ones. Clicking “Create new report” will take you to the My Reports tool, where you can create a report based on the metrics you wish to track.
If you already have a custom report for the domain, you’ll be shown a list of all your reports. From here, you can select which ones you want to connect with your client.
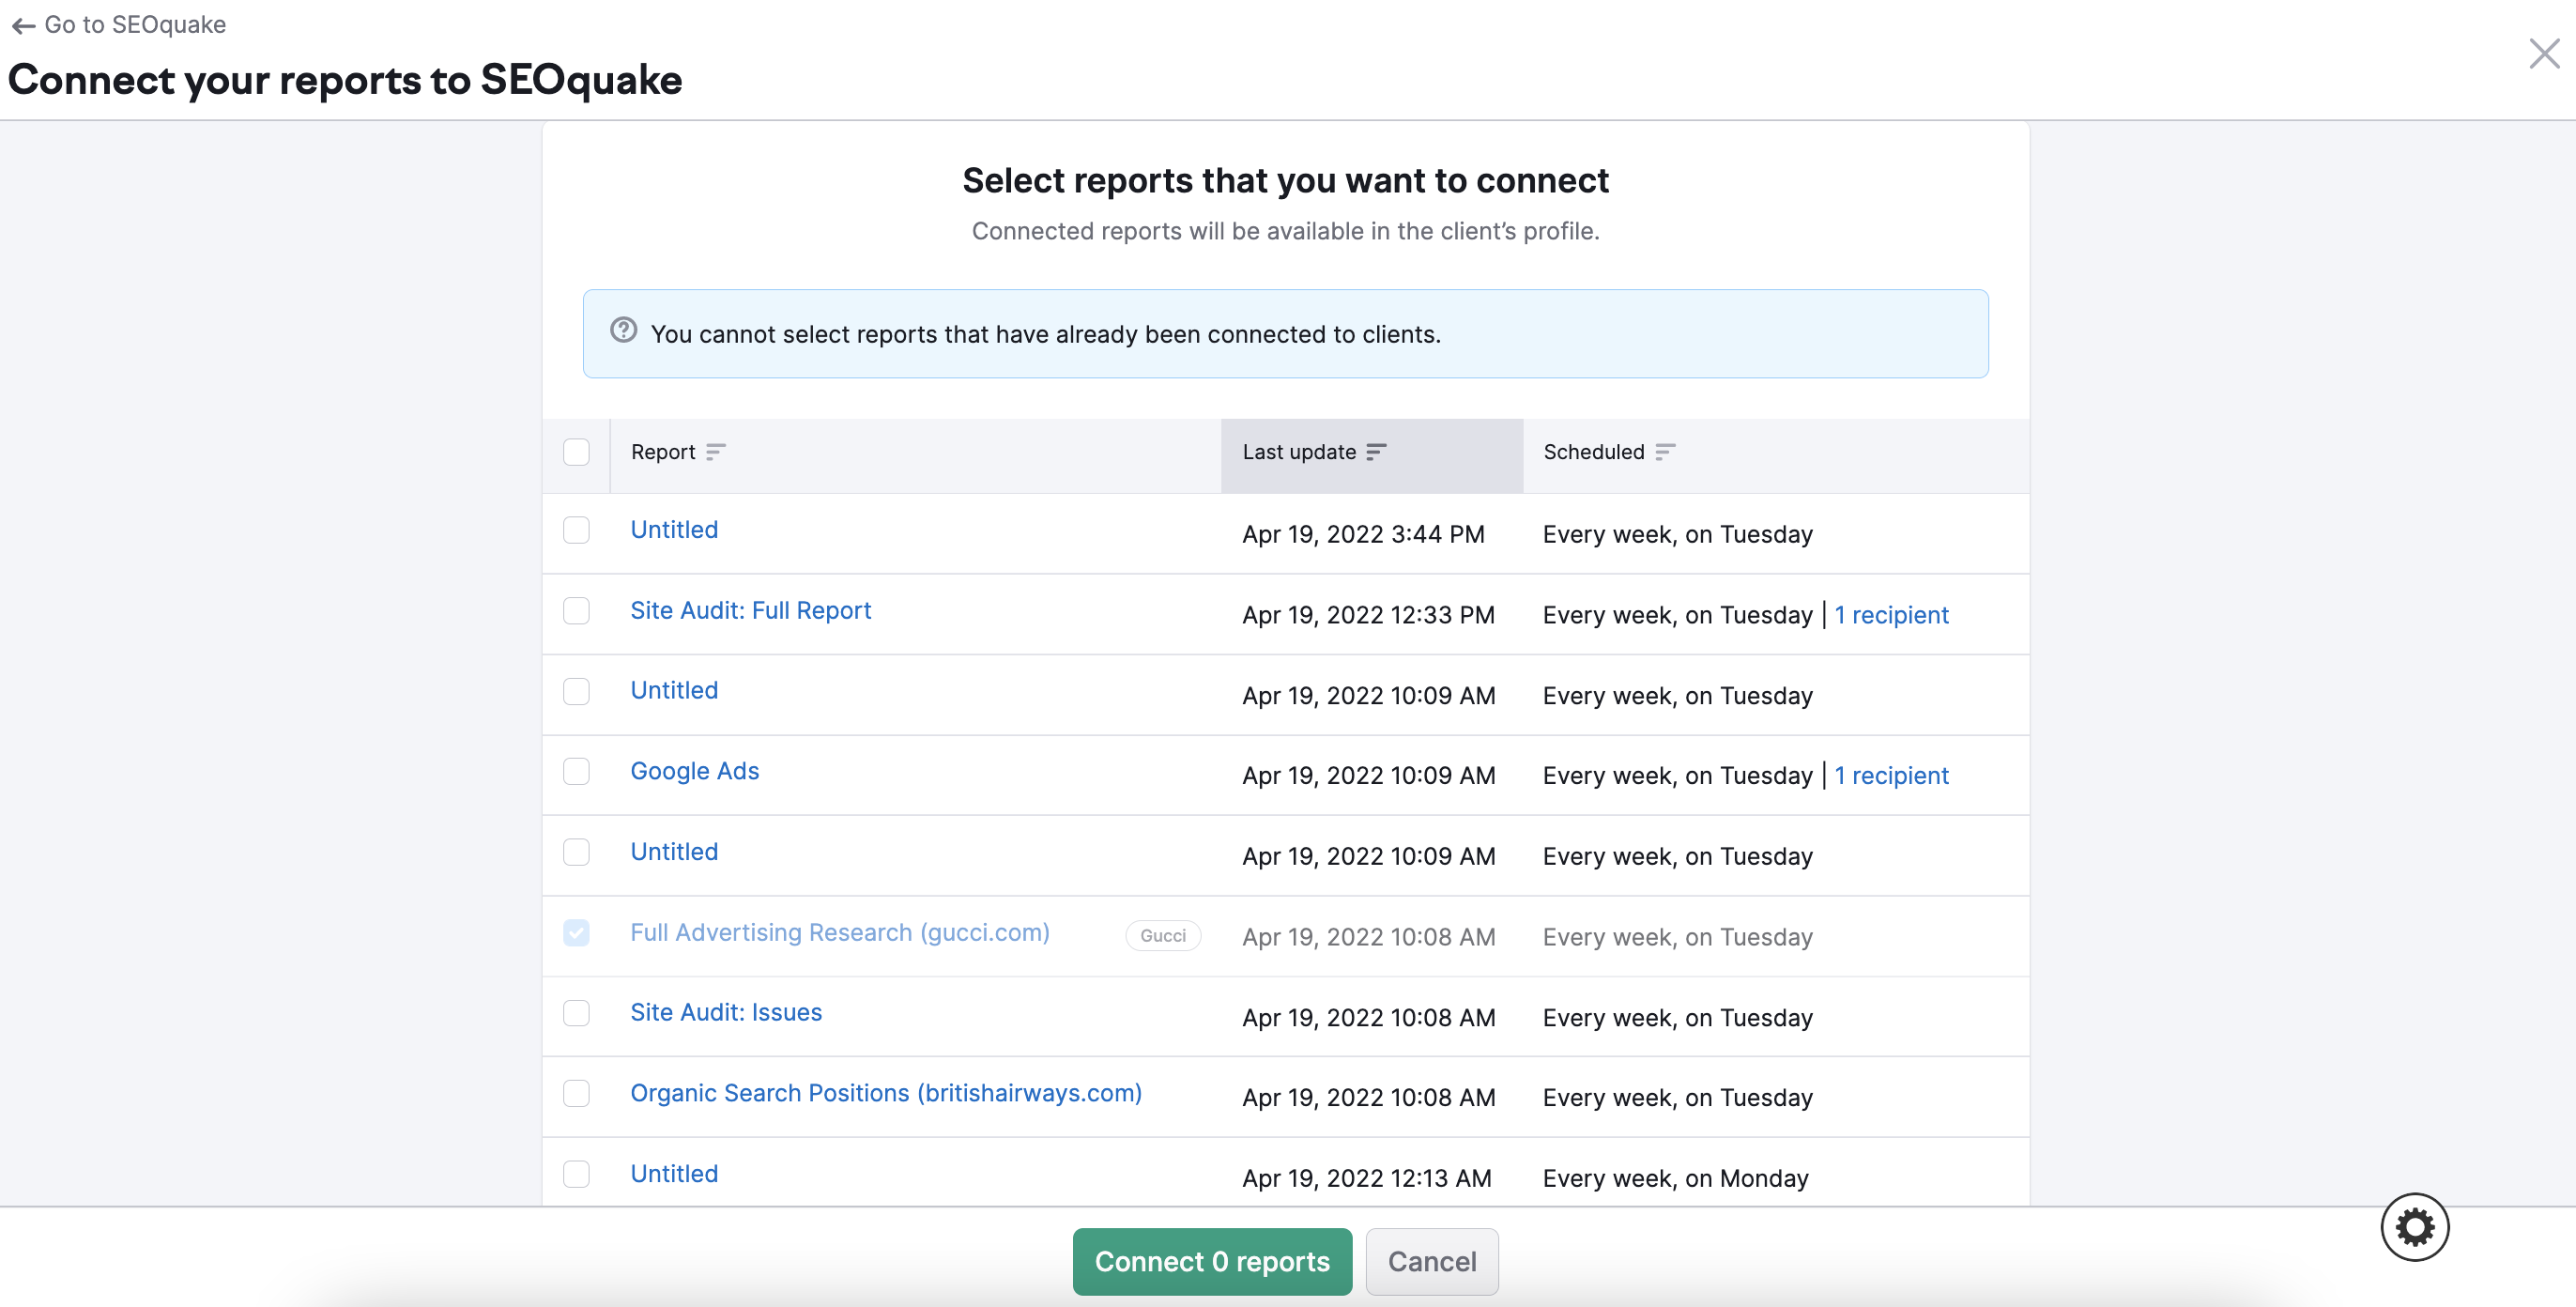
After you’ve connected your reports, you may want to connect a project. Just like with your reports, you can either create a new project for a client or connect to an existing one if you have it already set up.
Once you set up a project, you can see a quick overview of your project (with key metrics) in your CRM dashboard. If you want to get more details on a specific tool, simply click on it.
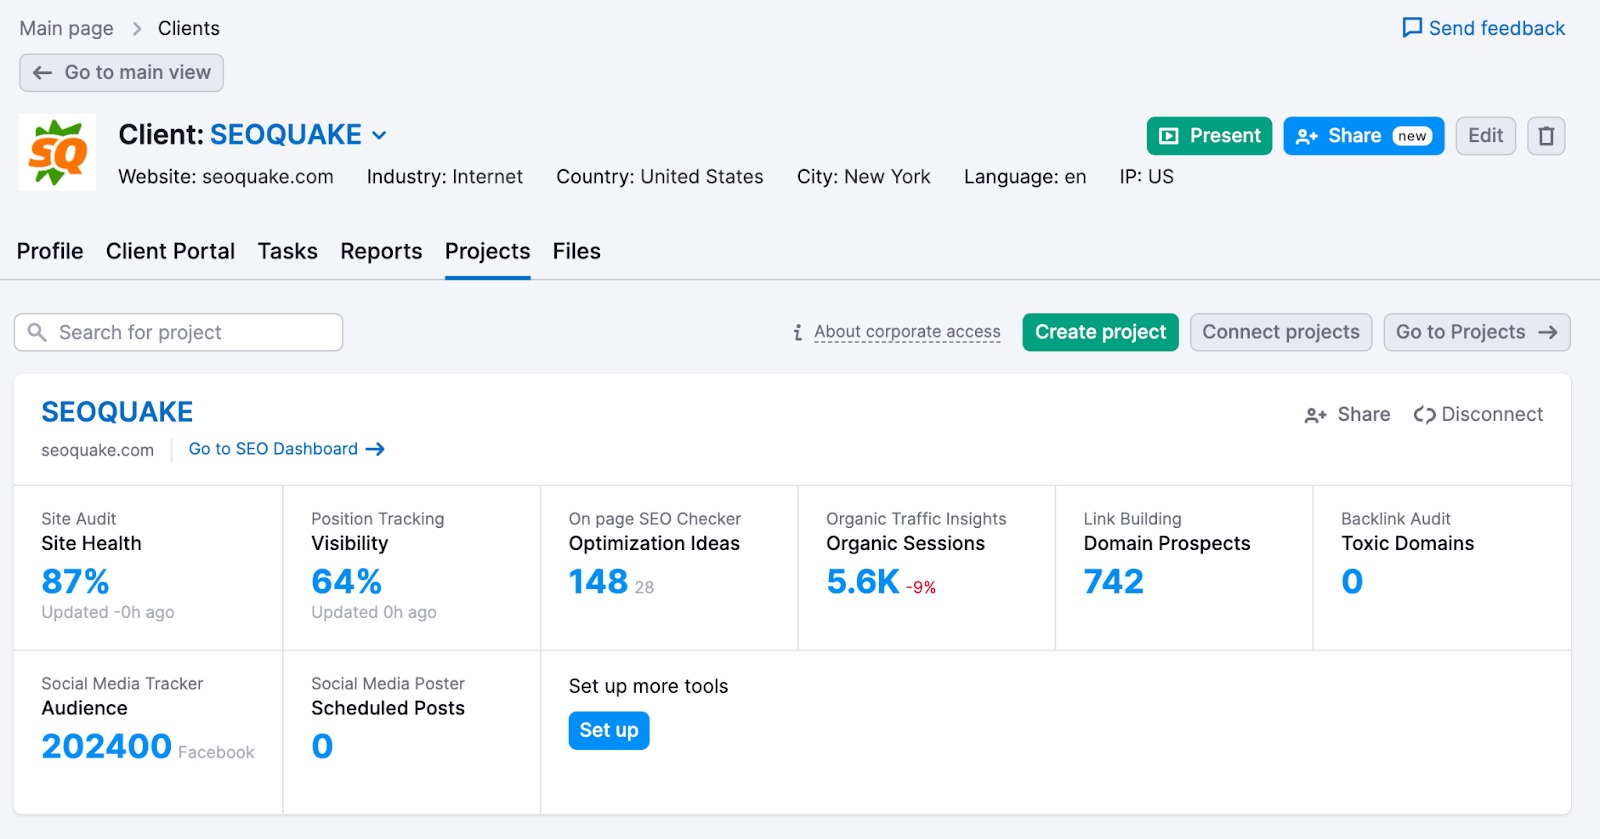
Apart from collecting data from Semrush projects and generating reports, you can also create tasks within CRM. This feature allows you to build a holistic workflow by combining data from both project and non-project Semrush tools.
To start, go to the “Tasks” tab and click “Create task”.
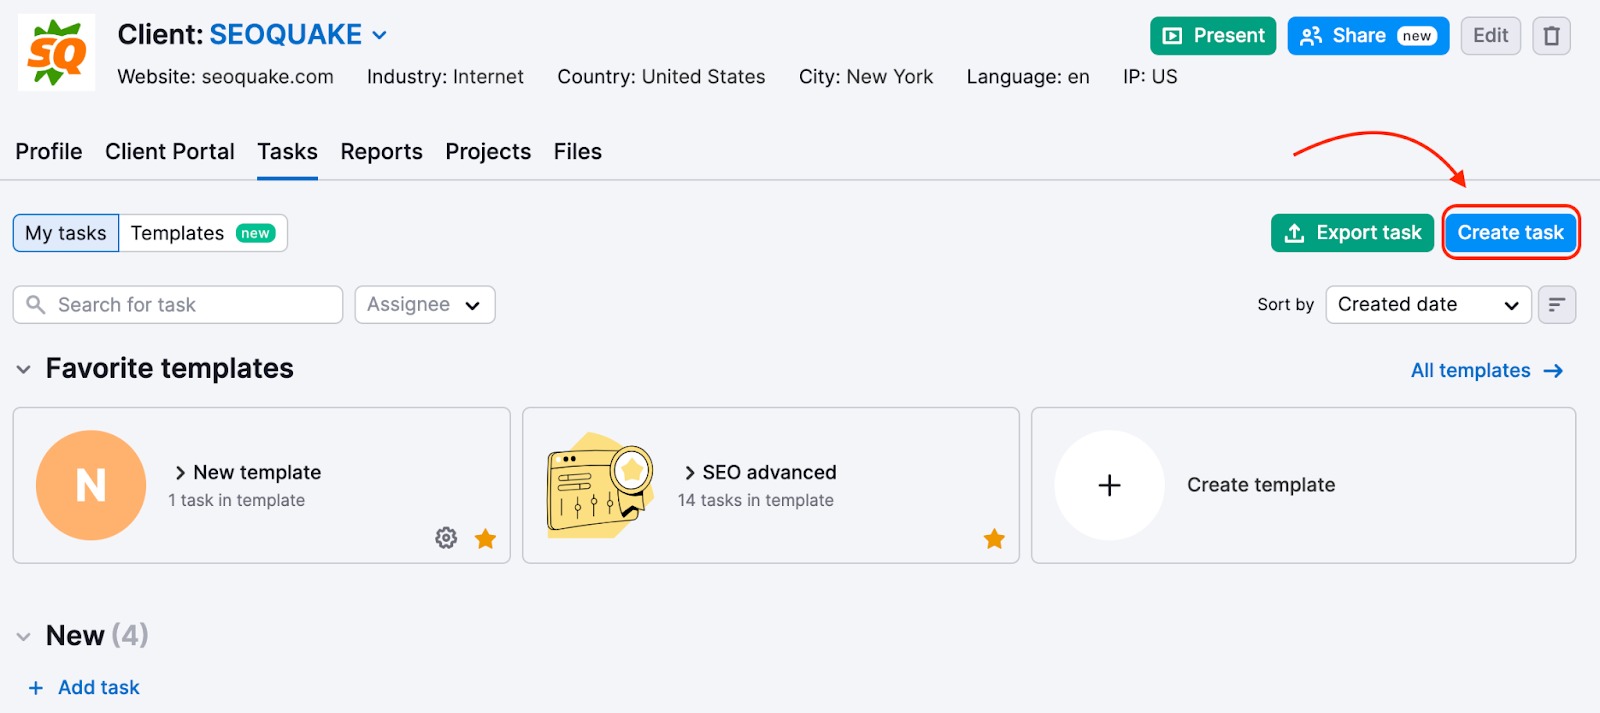
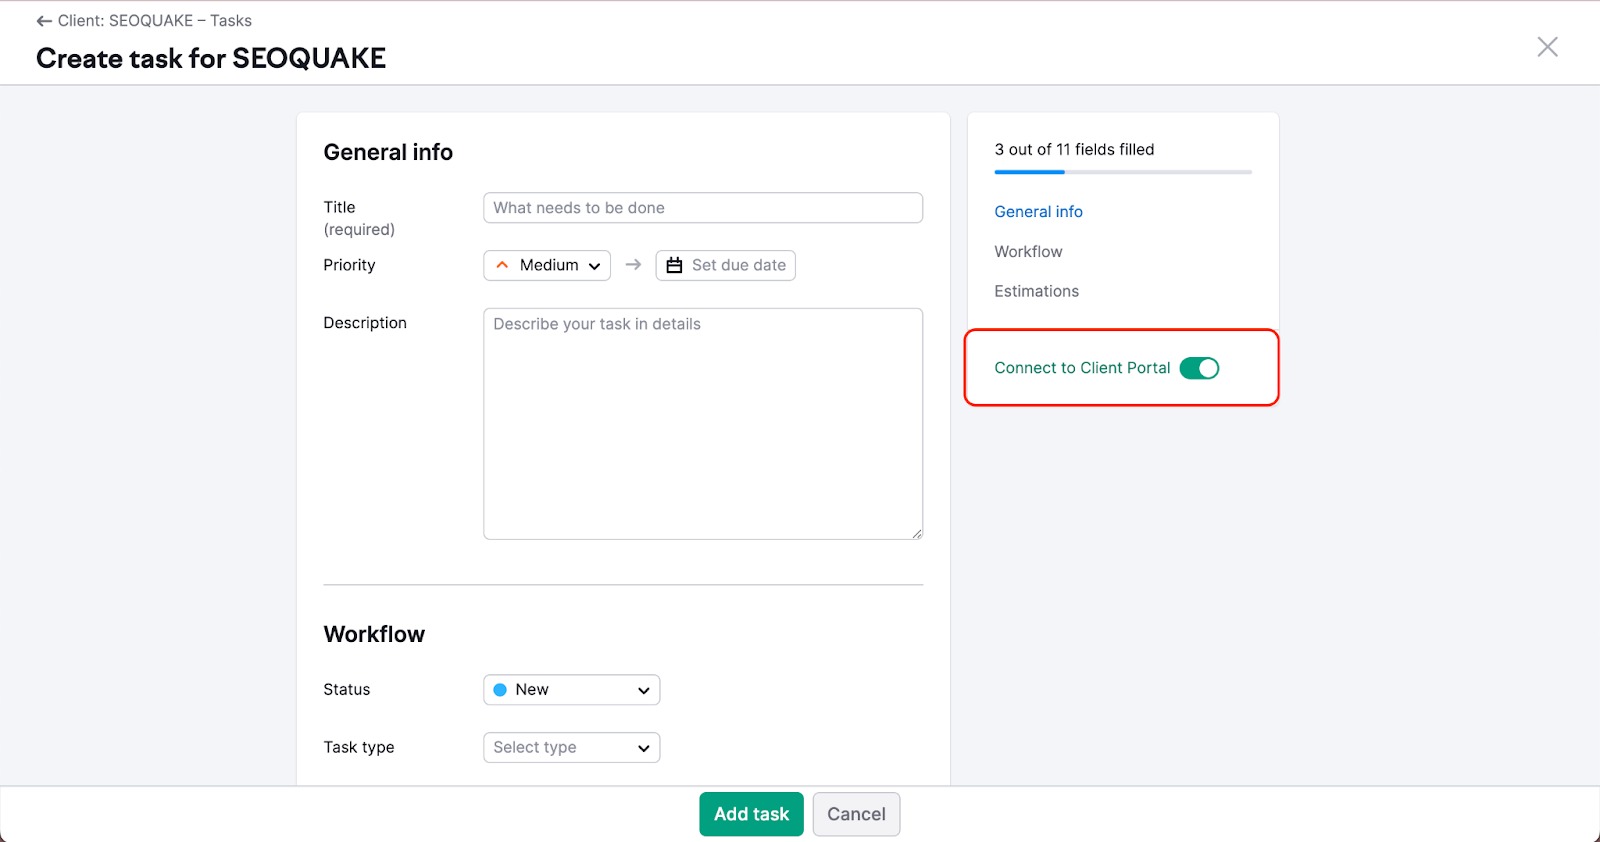
Enter the information about the task (such as priority, task type, status, and time estimation) and link it to the relevant Semrush tool. Additionally, you can send tasks straight to the Client Portal by enabling the switcher.
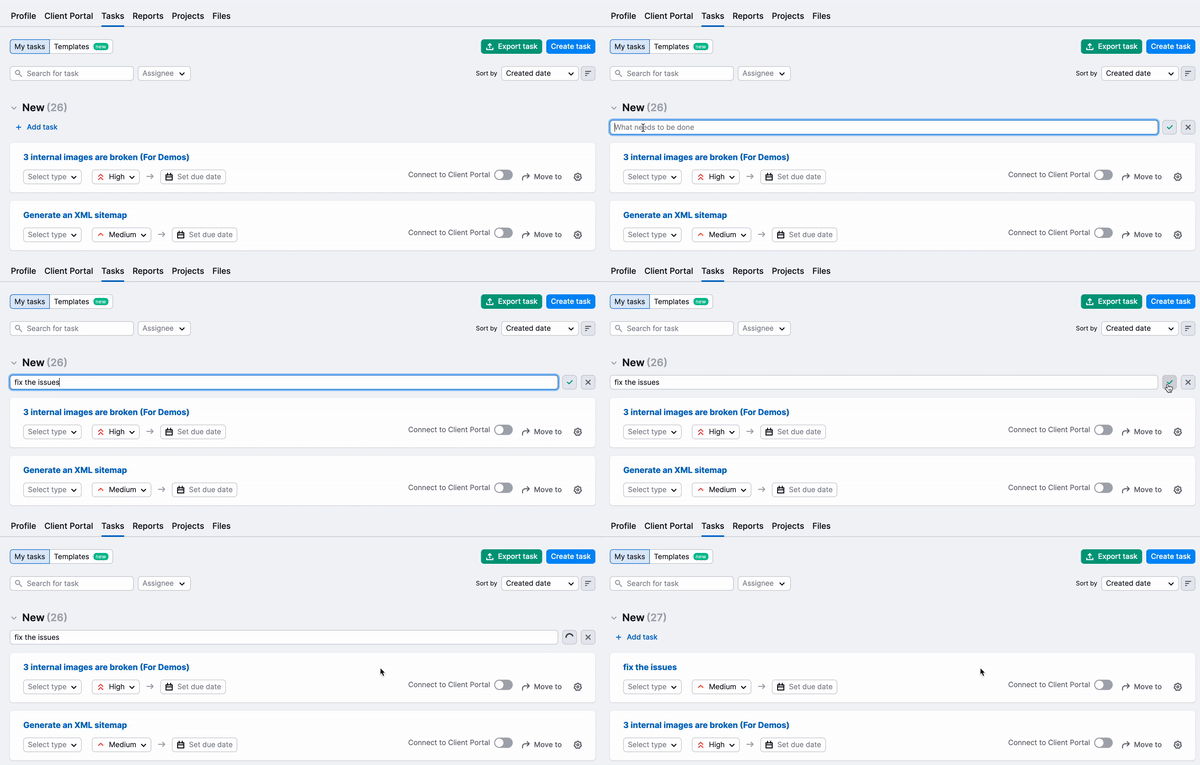
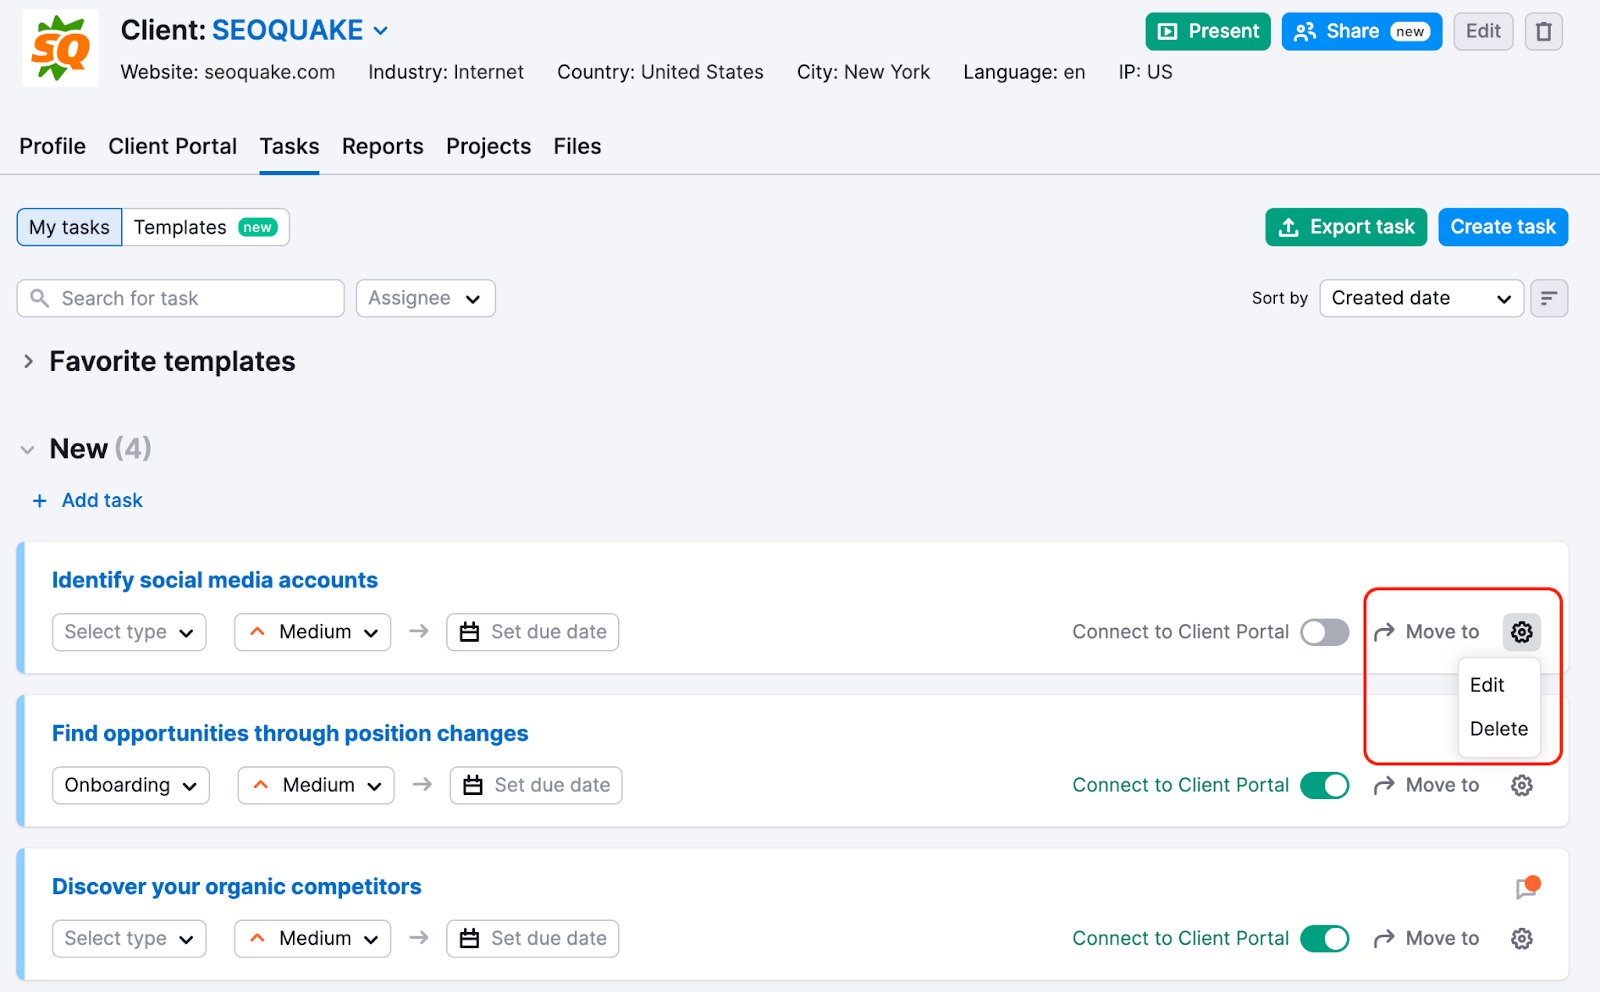
All tasks are automatically added to the task list, where they are divided by type. You can also create tasks inside this list to save time. To do so, click the “Add task” button and type in the task name in the selected category and click “Enter.”
Task status sections can be collapsed by clicking on the dropdown arrow next to each status. To delete or edit tasks, click the “Settings” gear in the top right corner of the page. To move tasks between categories, click “Move to.”
Clicking on a task name will open a dedicated task page with detailed information about the task, as well as shortcuts to the connected Semrush tools.
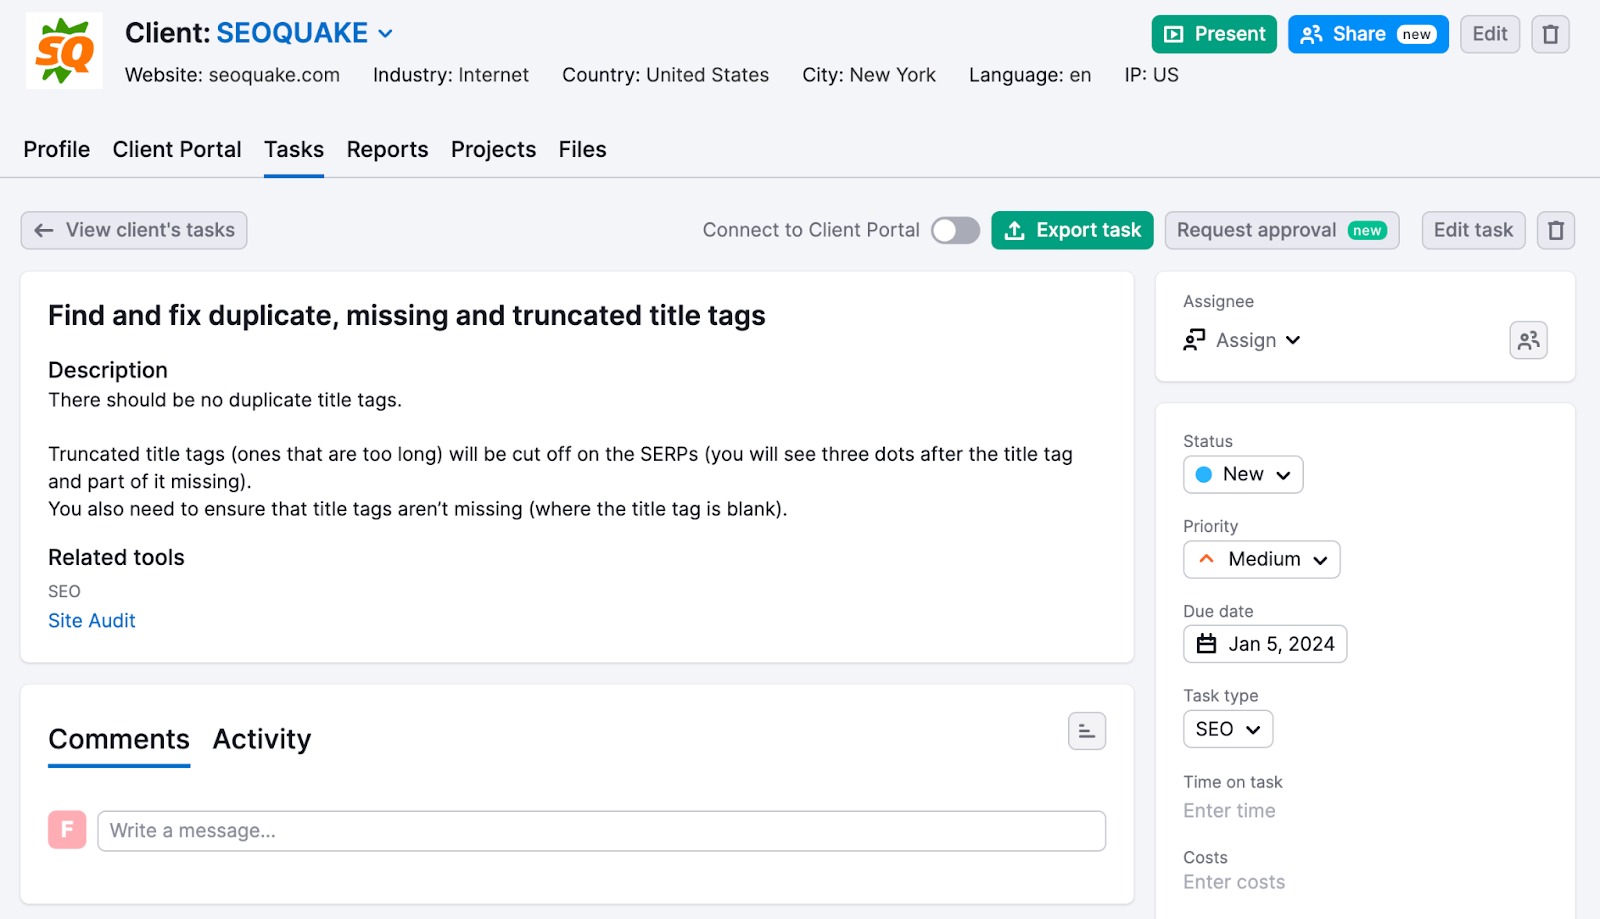
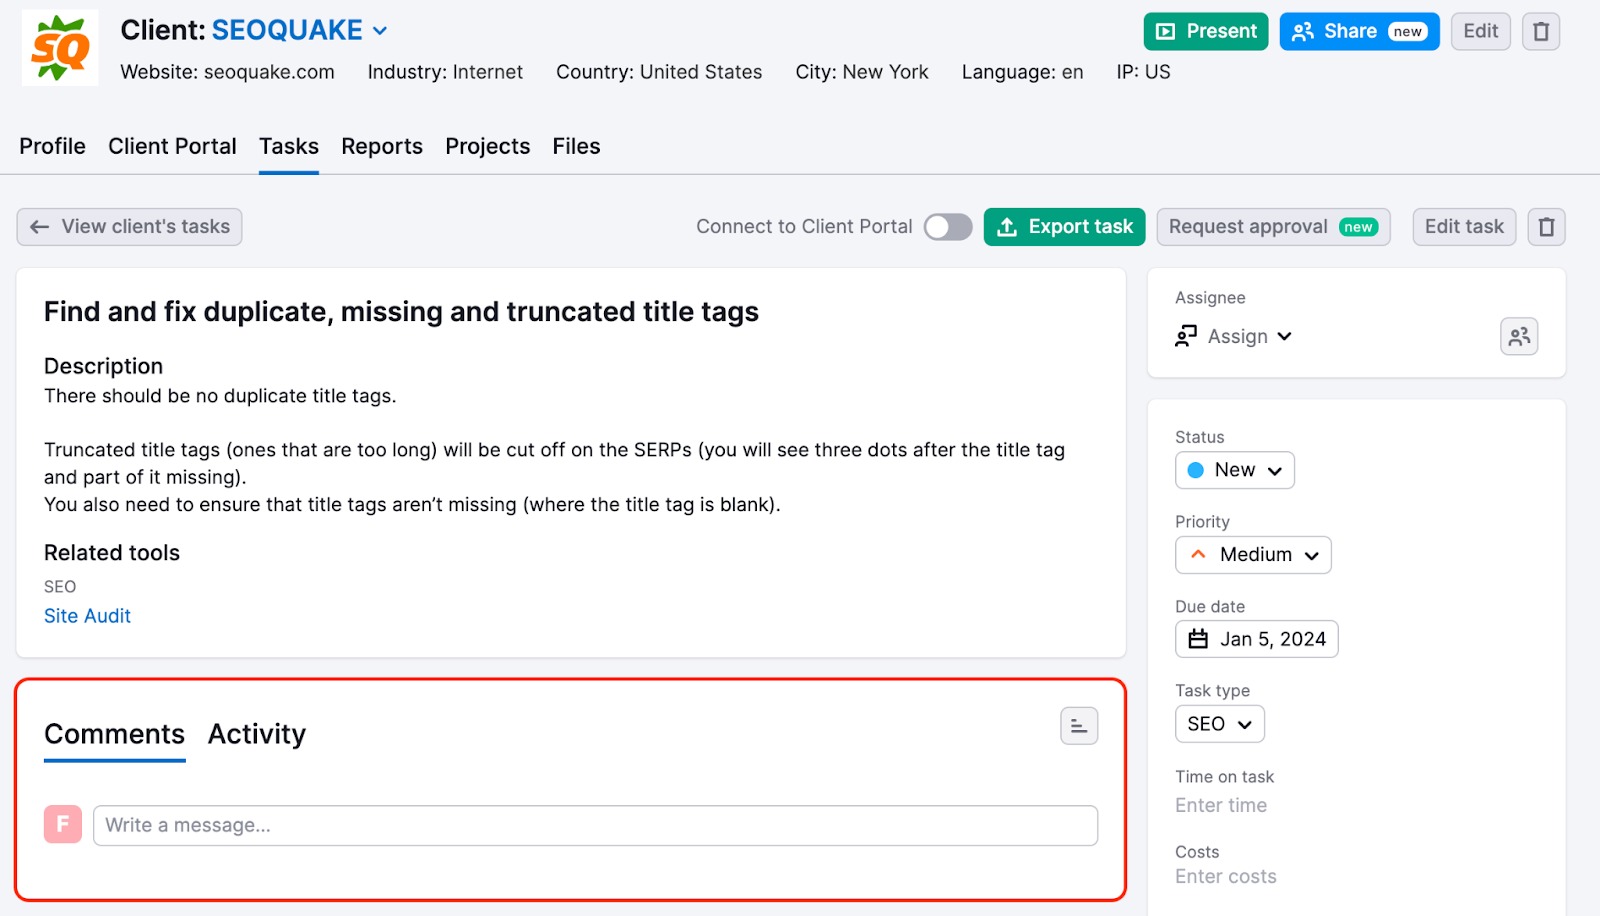
Within the task, there is the option to add comments or track the activity of the task with the Activity Log.
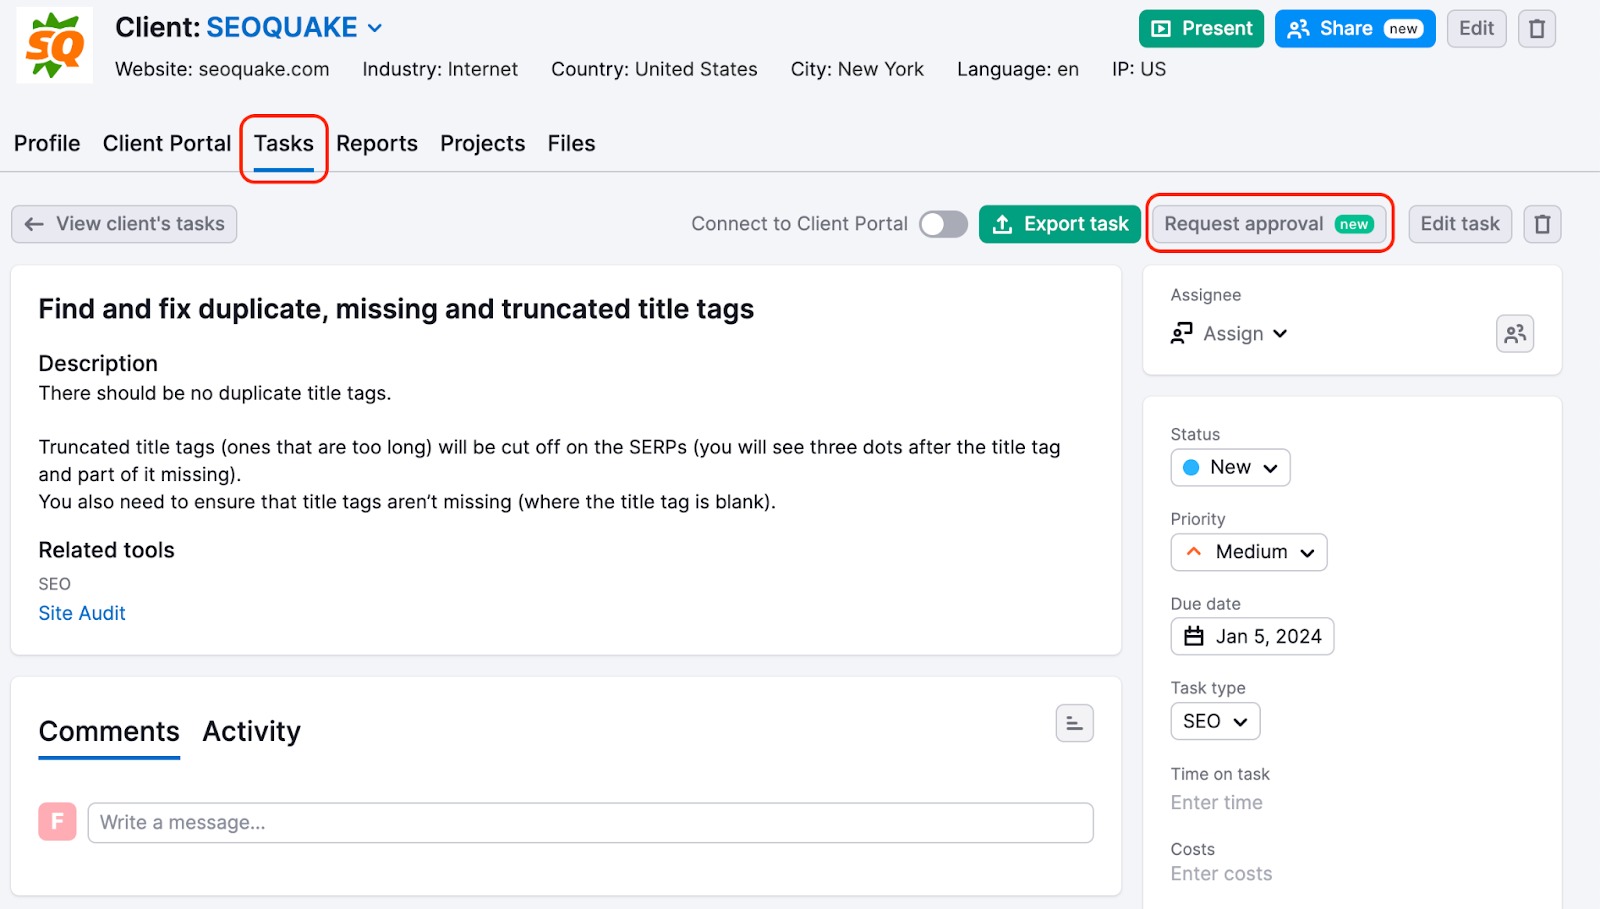
With the task approval feature, clients are notified when they need to approve a task. By having this workflow and keeping tasks in one place, the client experience is improved whilst also optimizing the workflow of the agency by streamlining communication.
For better collaboration, there’s an option to assign exact tasks inside clients’ cards. It may help in better workload distribution, provides a bird-eye-view of the active tasks between team members, and allows simplifying communication in collaborative projects.
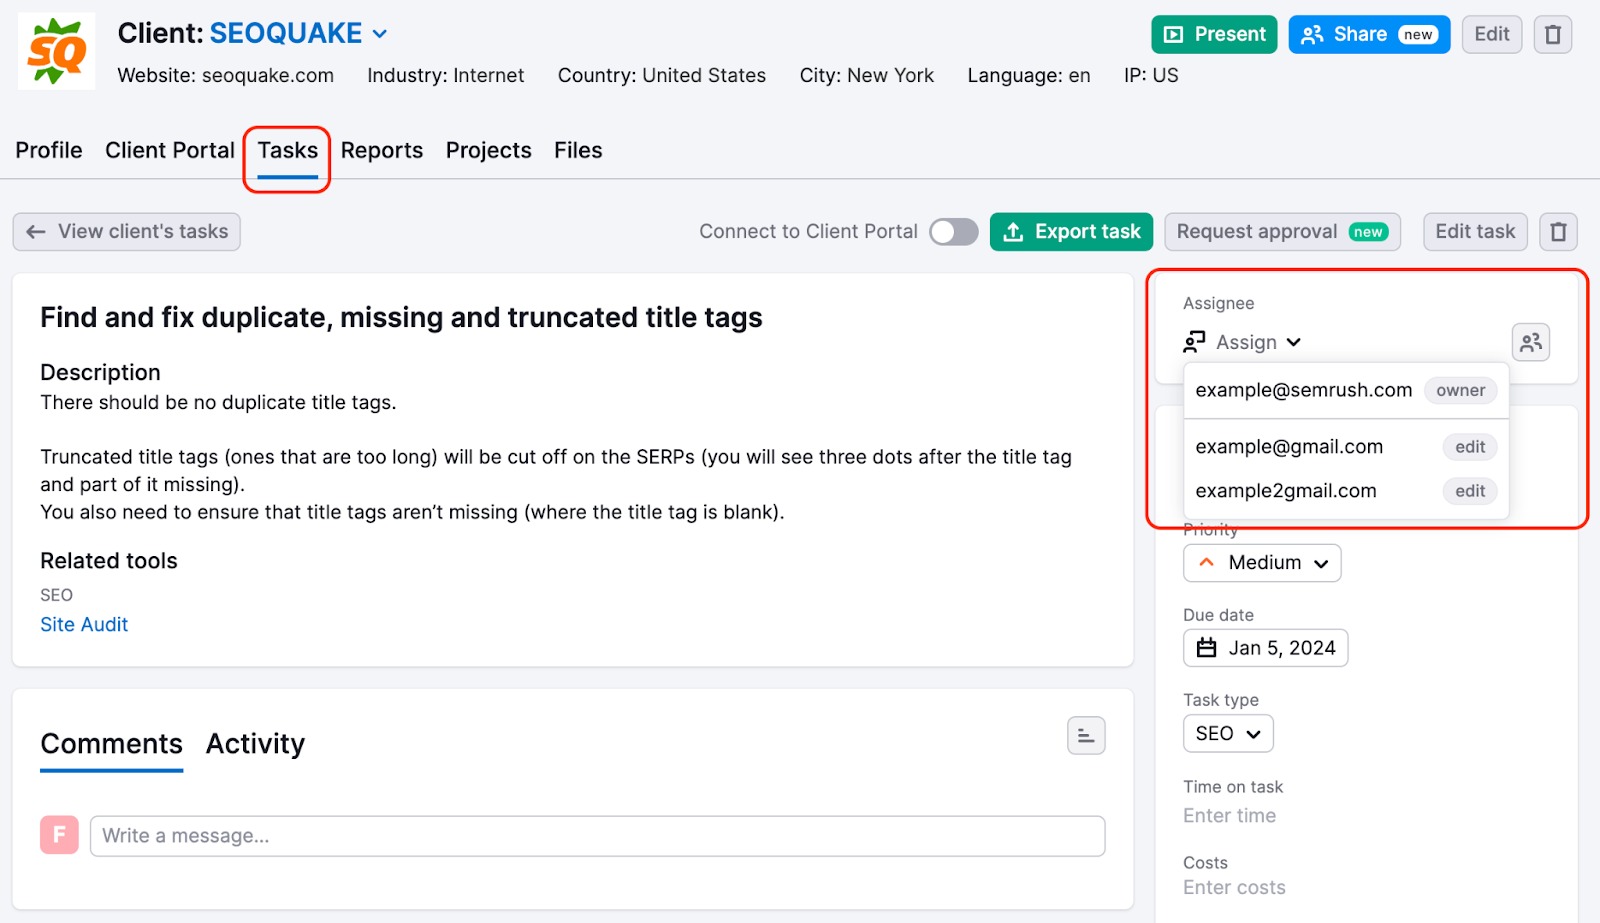
Please note that tasks can be assigned only after sharing a client with a view or edit permission. And, if a client is shared with anyone with edit permissions, they can also assign that client tasks.
Additionally, there’s a filter on CRM task pages:
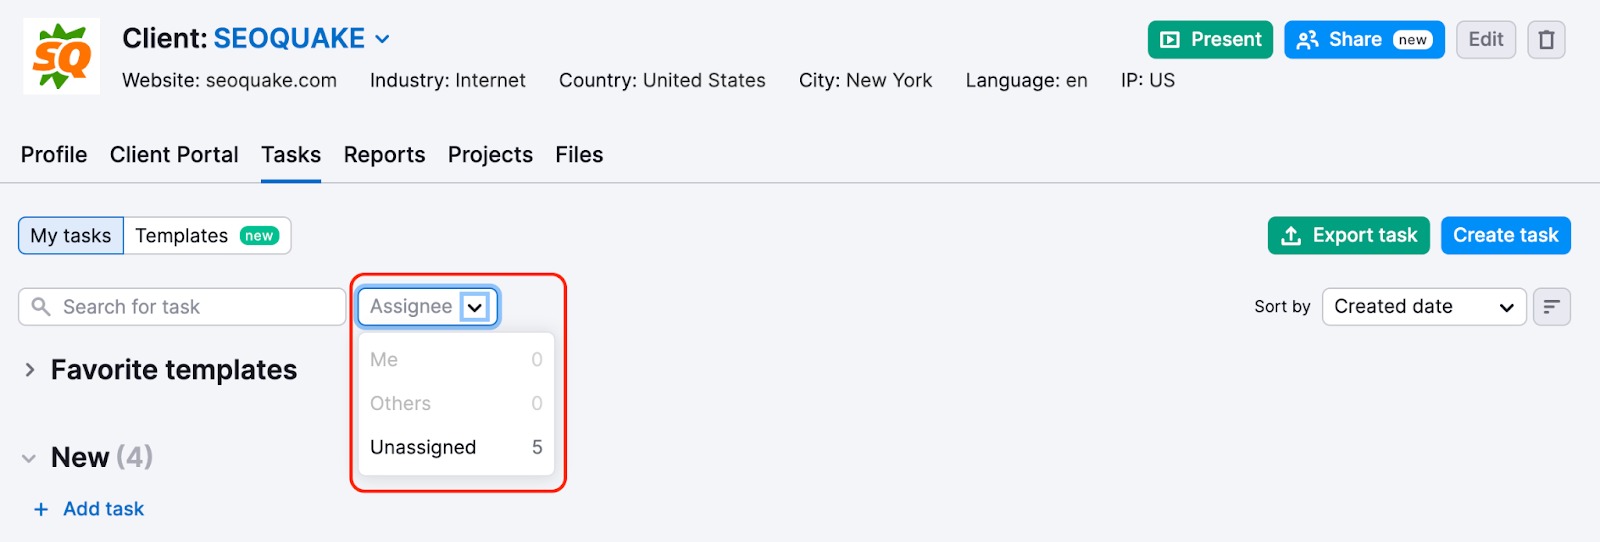
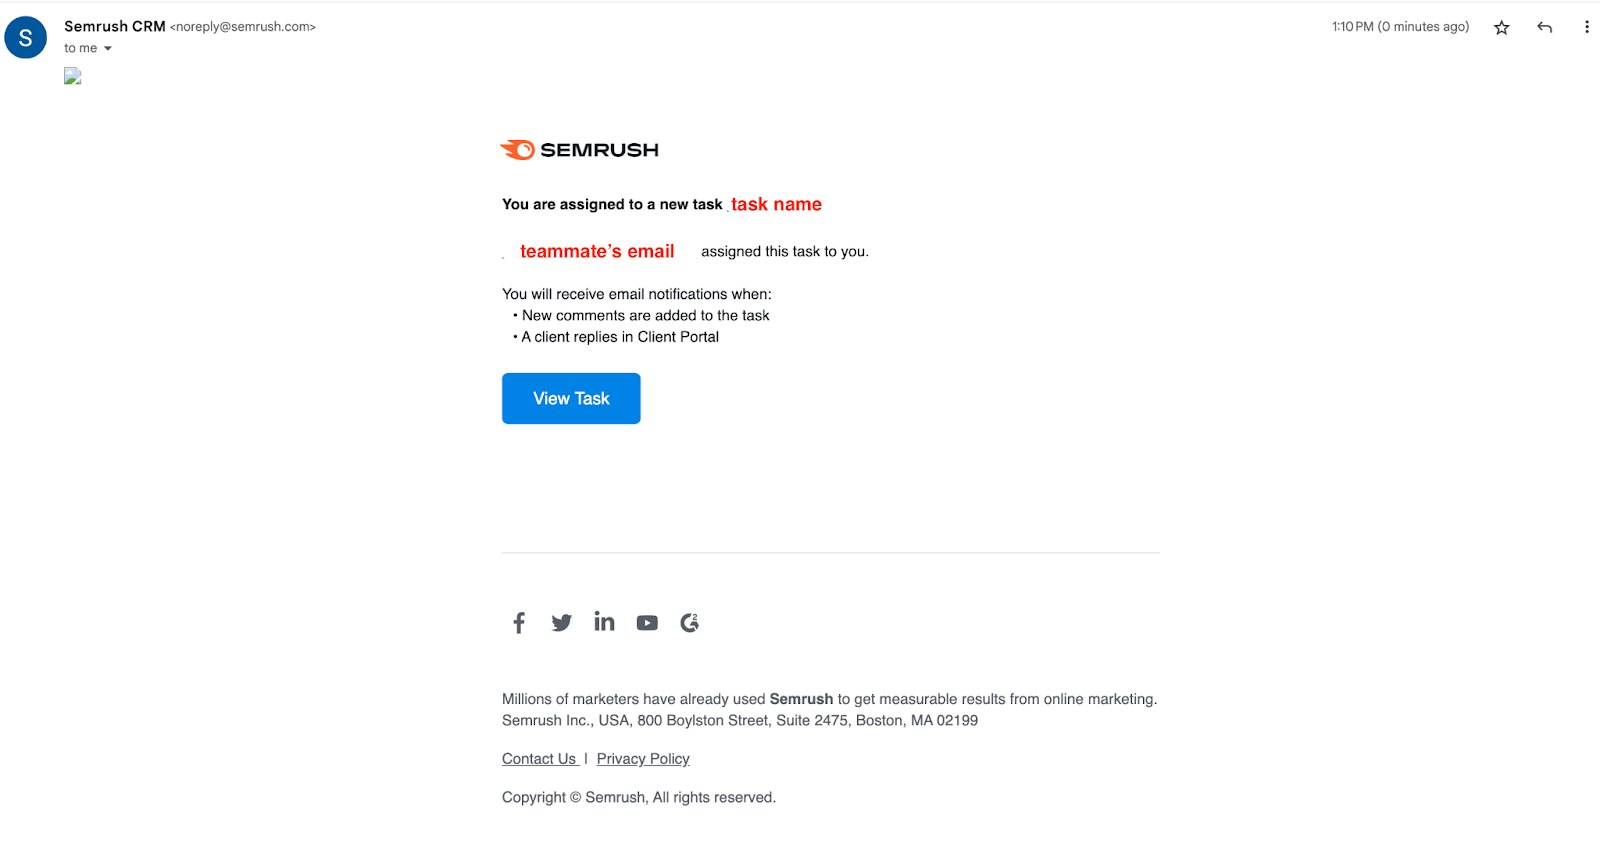
Once a team member is assigned to a task, an email notification will be sent to the assigned person. Also, if any comment is added to a task, an owner, a manager, and a person responsible for the task will be notified via email.
Templates
Within the “Tasks” tab you can also find a “Templates” button where you will see premade checklists and task templates related to different marketing agency areas.
Each task has a description and lists related tools to guide you through the process. You can use the entire checklist or a single task. “Templates” makes getting started easy and ensures you’re not missing anything important.
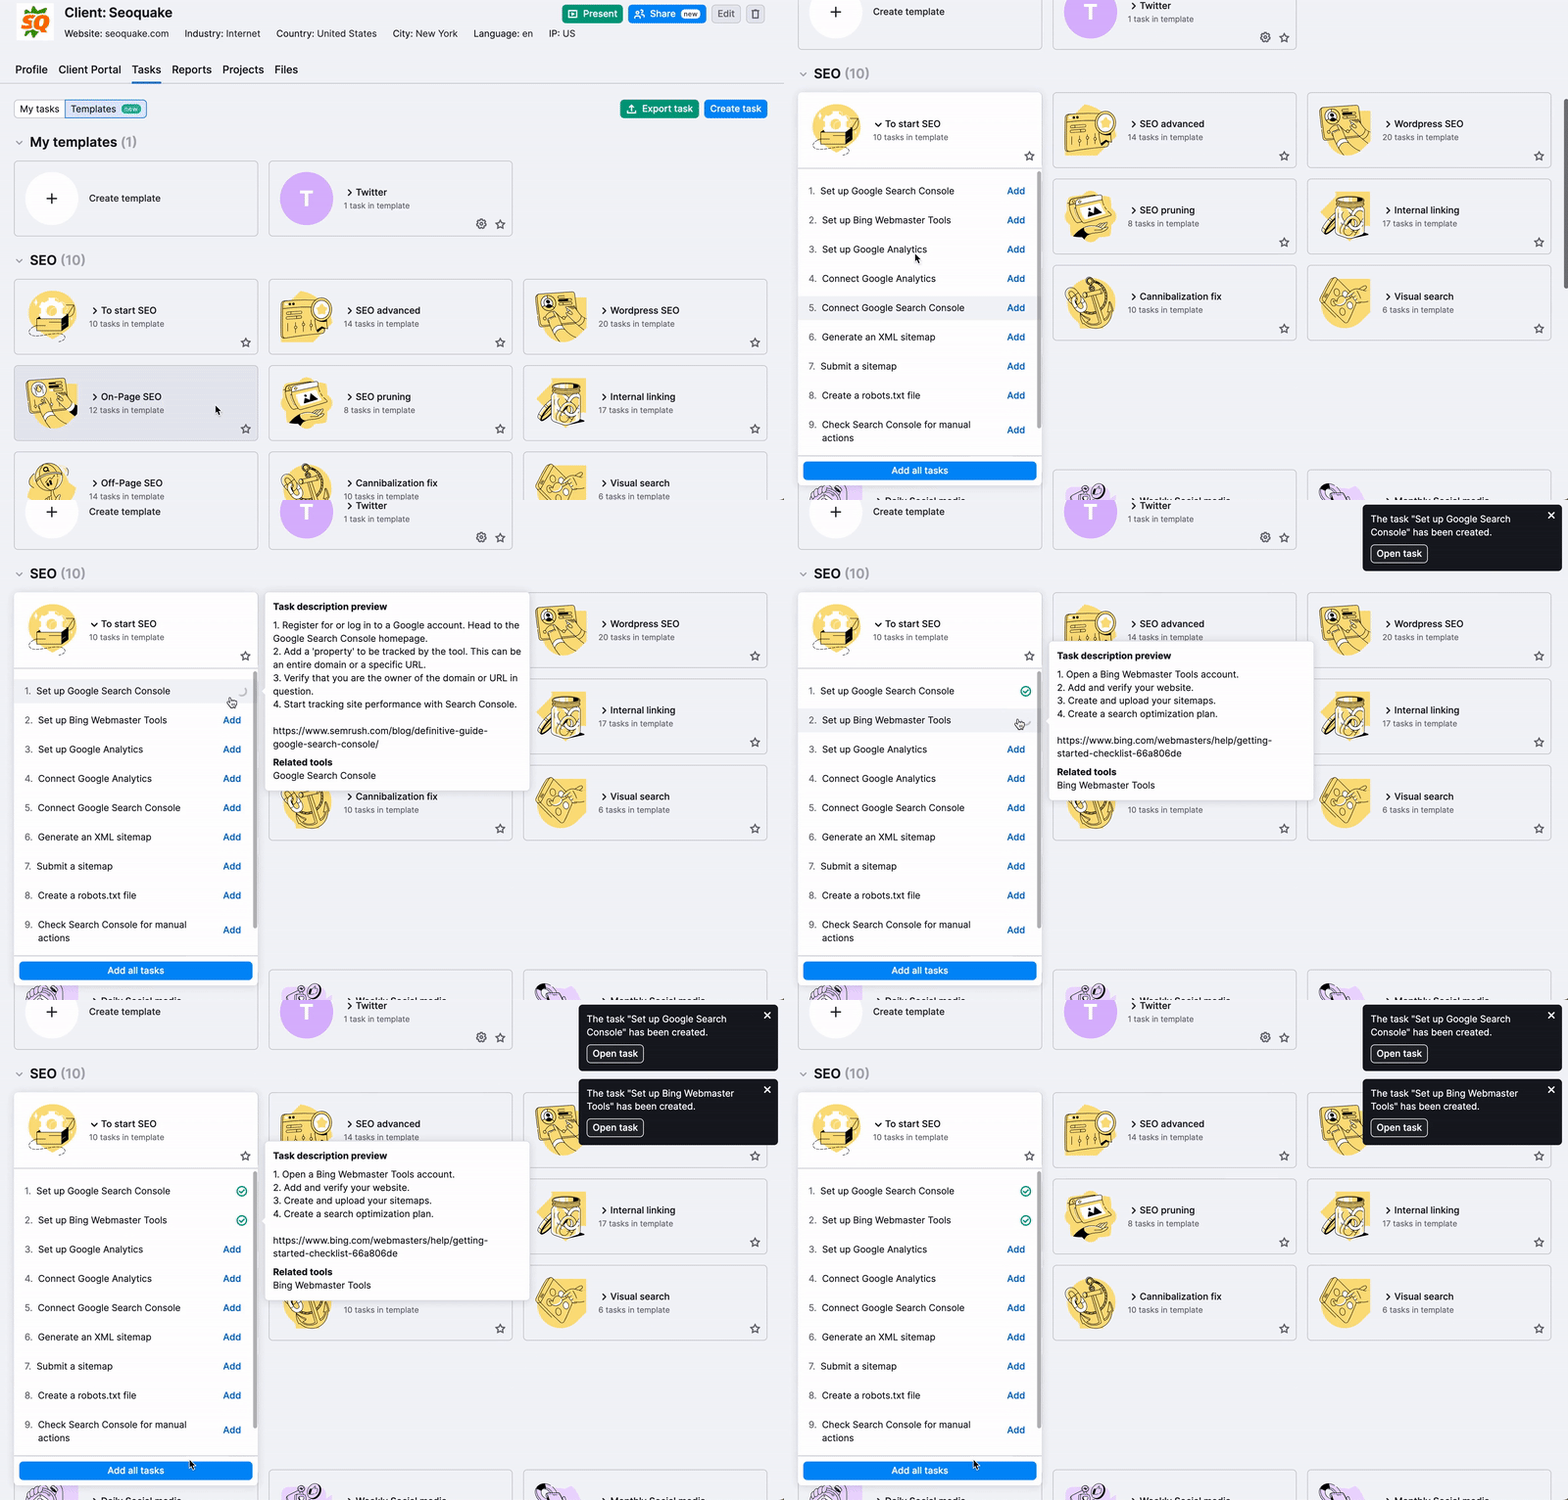
Additionally, there’s an option to create custom templates by clicking “Create template”. This functionality allows you to add tasks required for your own workflows.
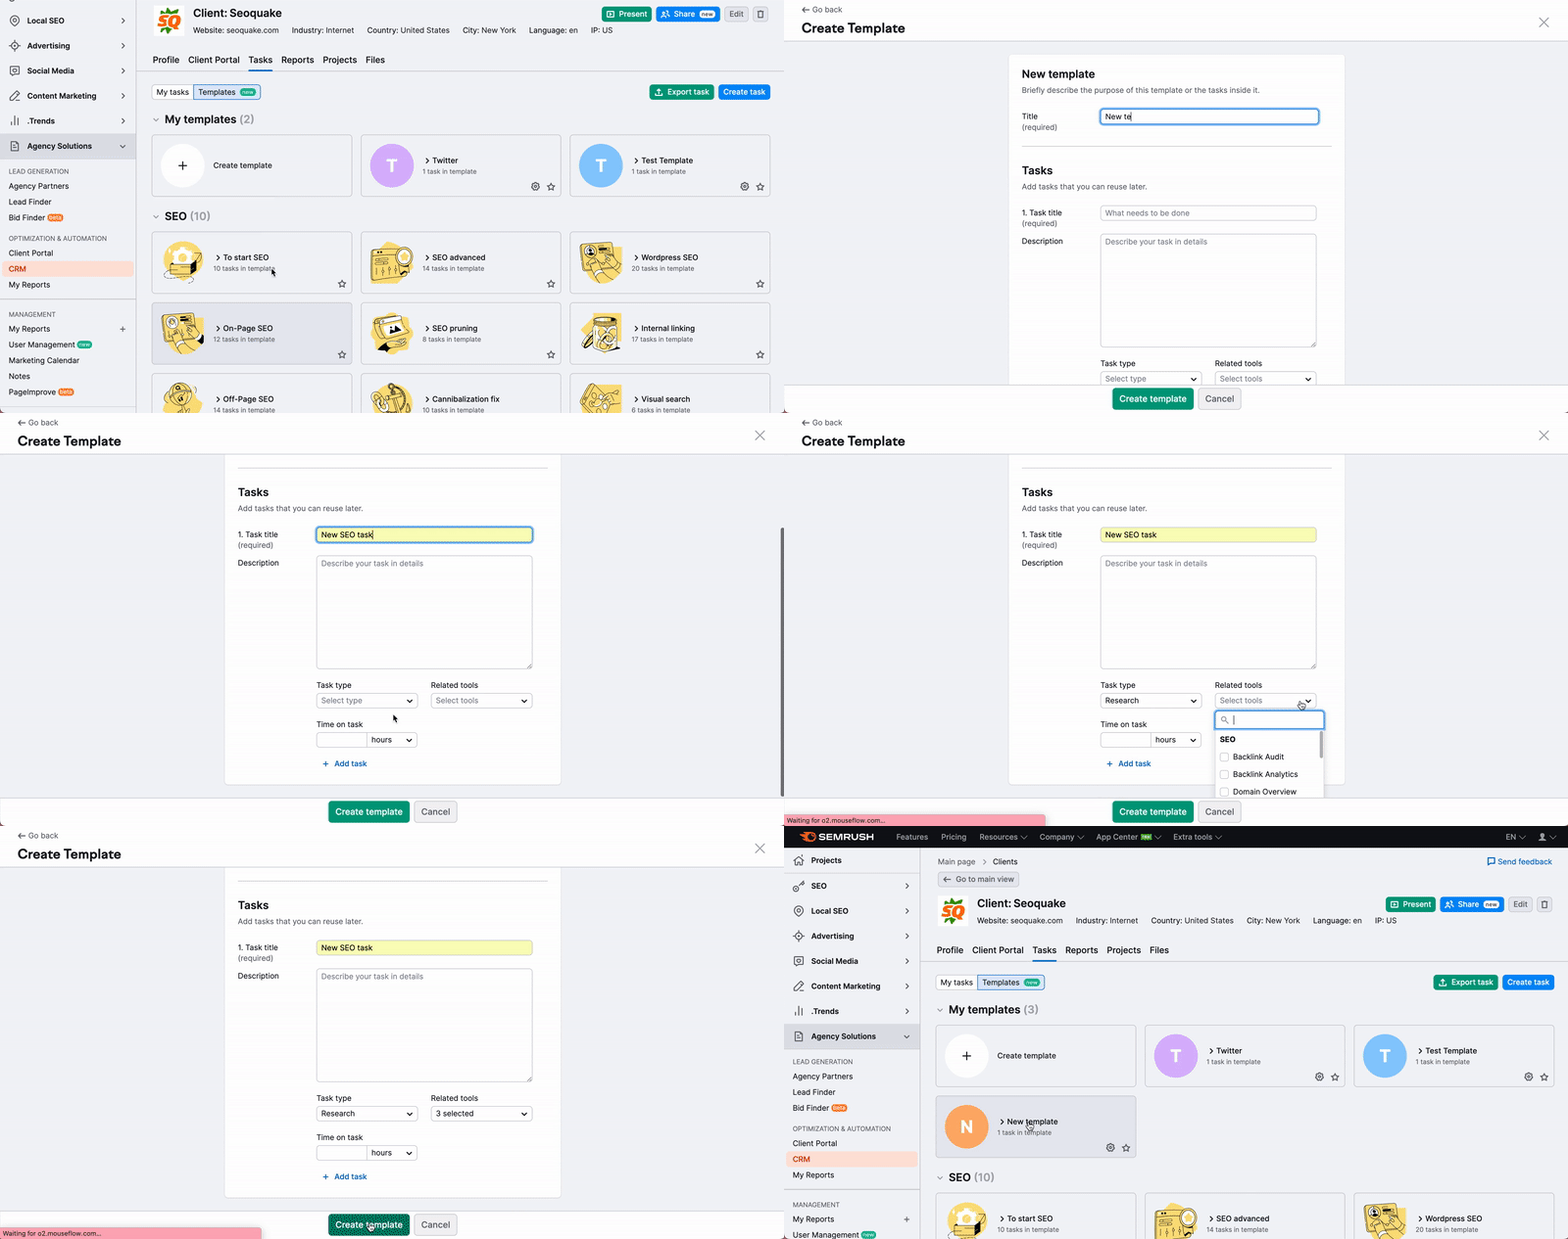
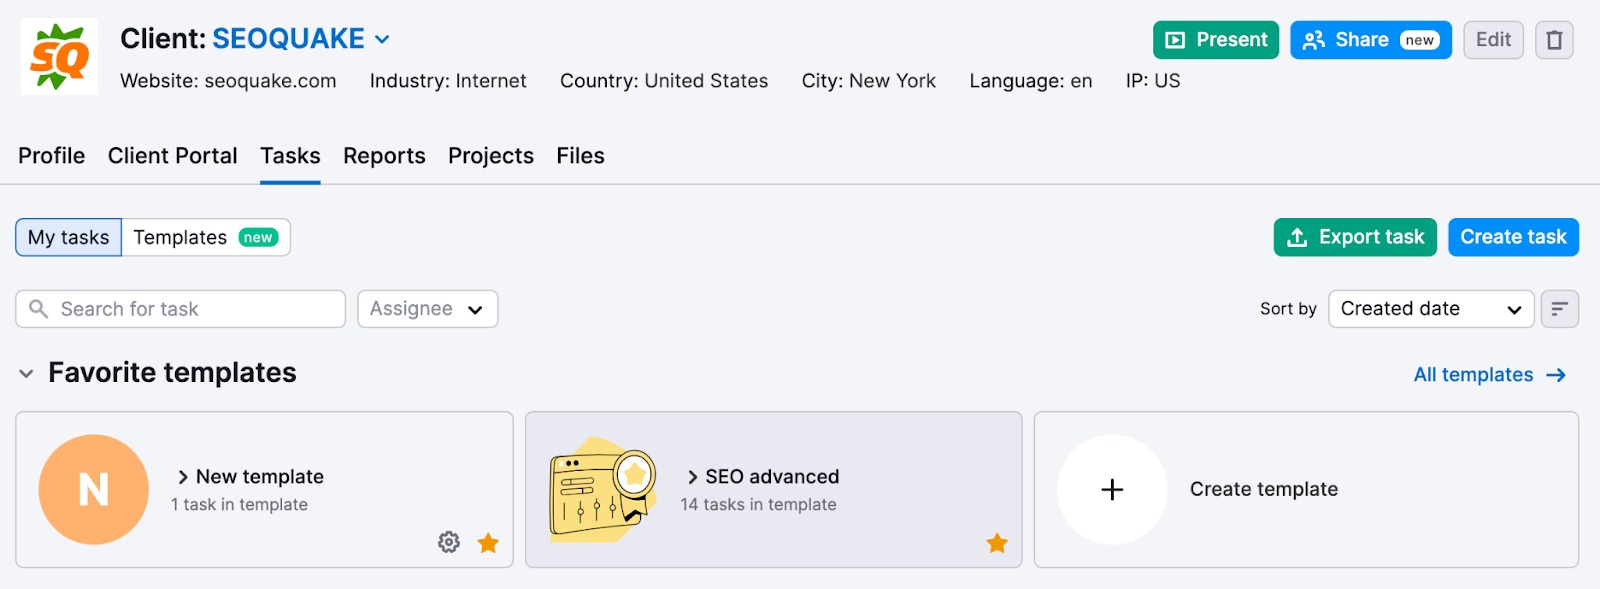
What is more, you can add templates to favorites by clicking the “Star” icon. Thus, such templates will appear under the My tasks tab in the “Favorite templates” section:
Tasks View
Easily work with all your tasks from different clients in one place by switching to Tasks view. Switch to Task view in the header of the tool.
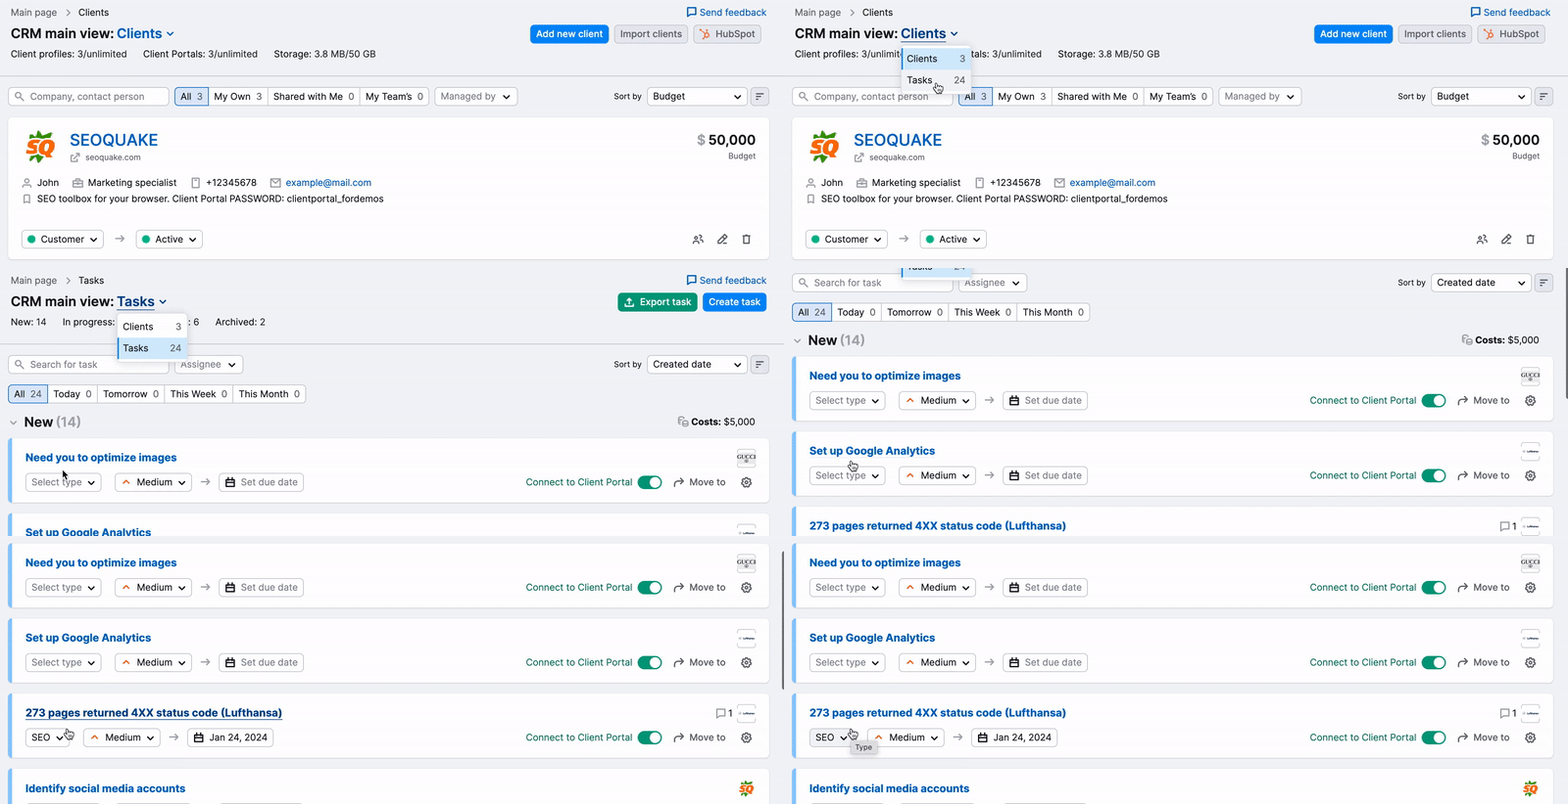
This provides a dashboard with all the tasks a user has between all their clients. The dashboard provides different filtering and sorting options and can be swapped back to Clients view when needed.
One of the key elements of CRM is Client Portal, an agency-tailored client collaboration tool. It allows you to create secure, accessible portals for each of your clients (whether they are Semrush users or not), through which they can access dynamic reports, tasks, and files.
Please note that Client Portal is only available as part of the Agency Growth Kit.
To get started, select your chosen client and then open the Client Portal tab. You will need to choose a name and password for the portal to be shared with your client. Choose the reports that you want to showcase in the portal and configure how often you want them to be updated.
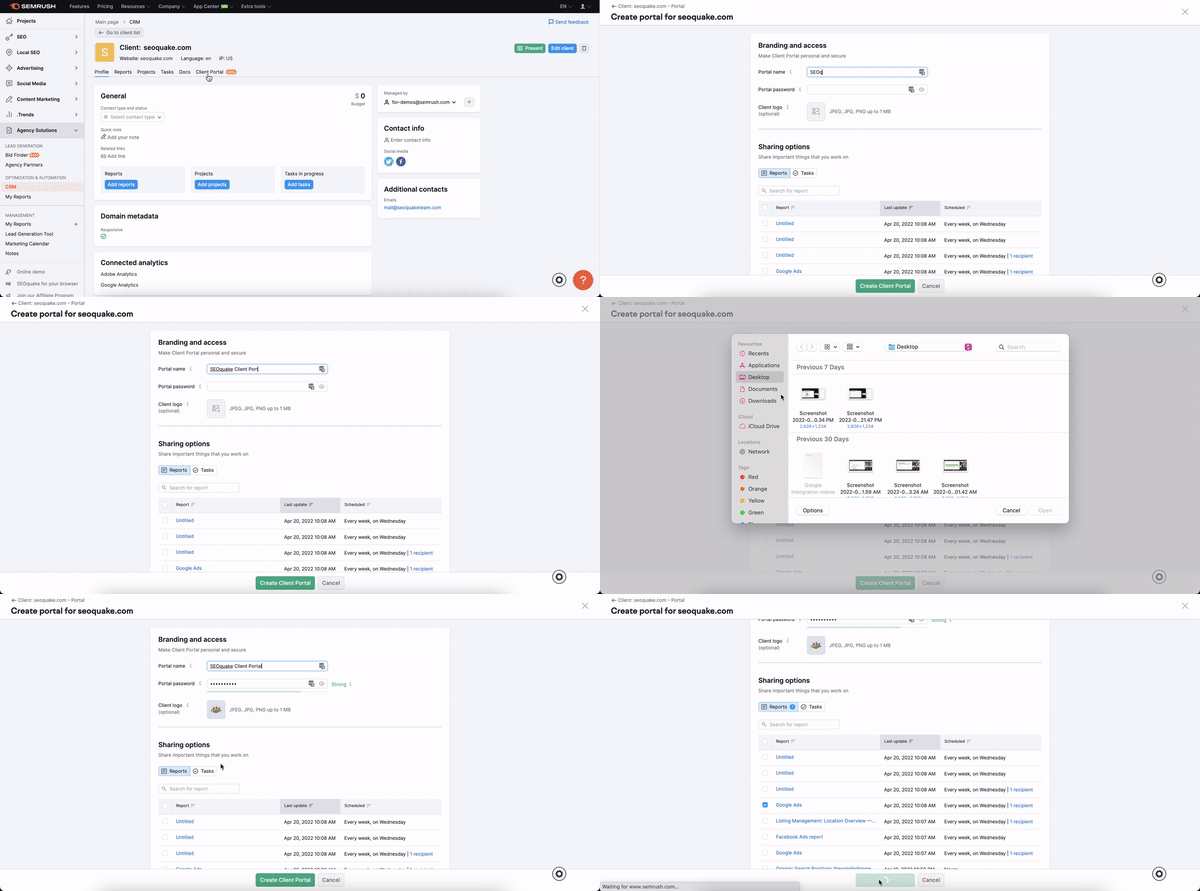
Once the client has received the portal name and password, they can log in and see the dashboard that you have shared with them.

To see the dashboard in detail from a client’s perspective, you can access the free Client Portal demo page here.
To increase transparency in the reporting process and reduce the need for interaction between you and your clients, it’s also possible to list the tasks you are (and have been) working on (along with brief descriptions to provide context and clarity). Your clients can see these in the Tasks tab of the Client Portal.

To improve communication between an agency and its clients, it is possible to use the comments feature. Task commenting allows agencies’ clients (with access to their Portals) to leave comments on the task, allowing tasks to be discussed within the Client Portal. These comments will also be added to a client’s card in CRM.

You can see if there are any unread comments for your tasks if the comments icon appears.
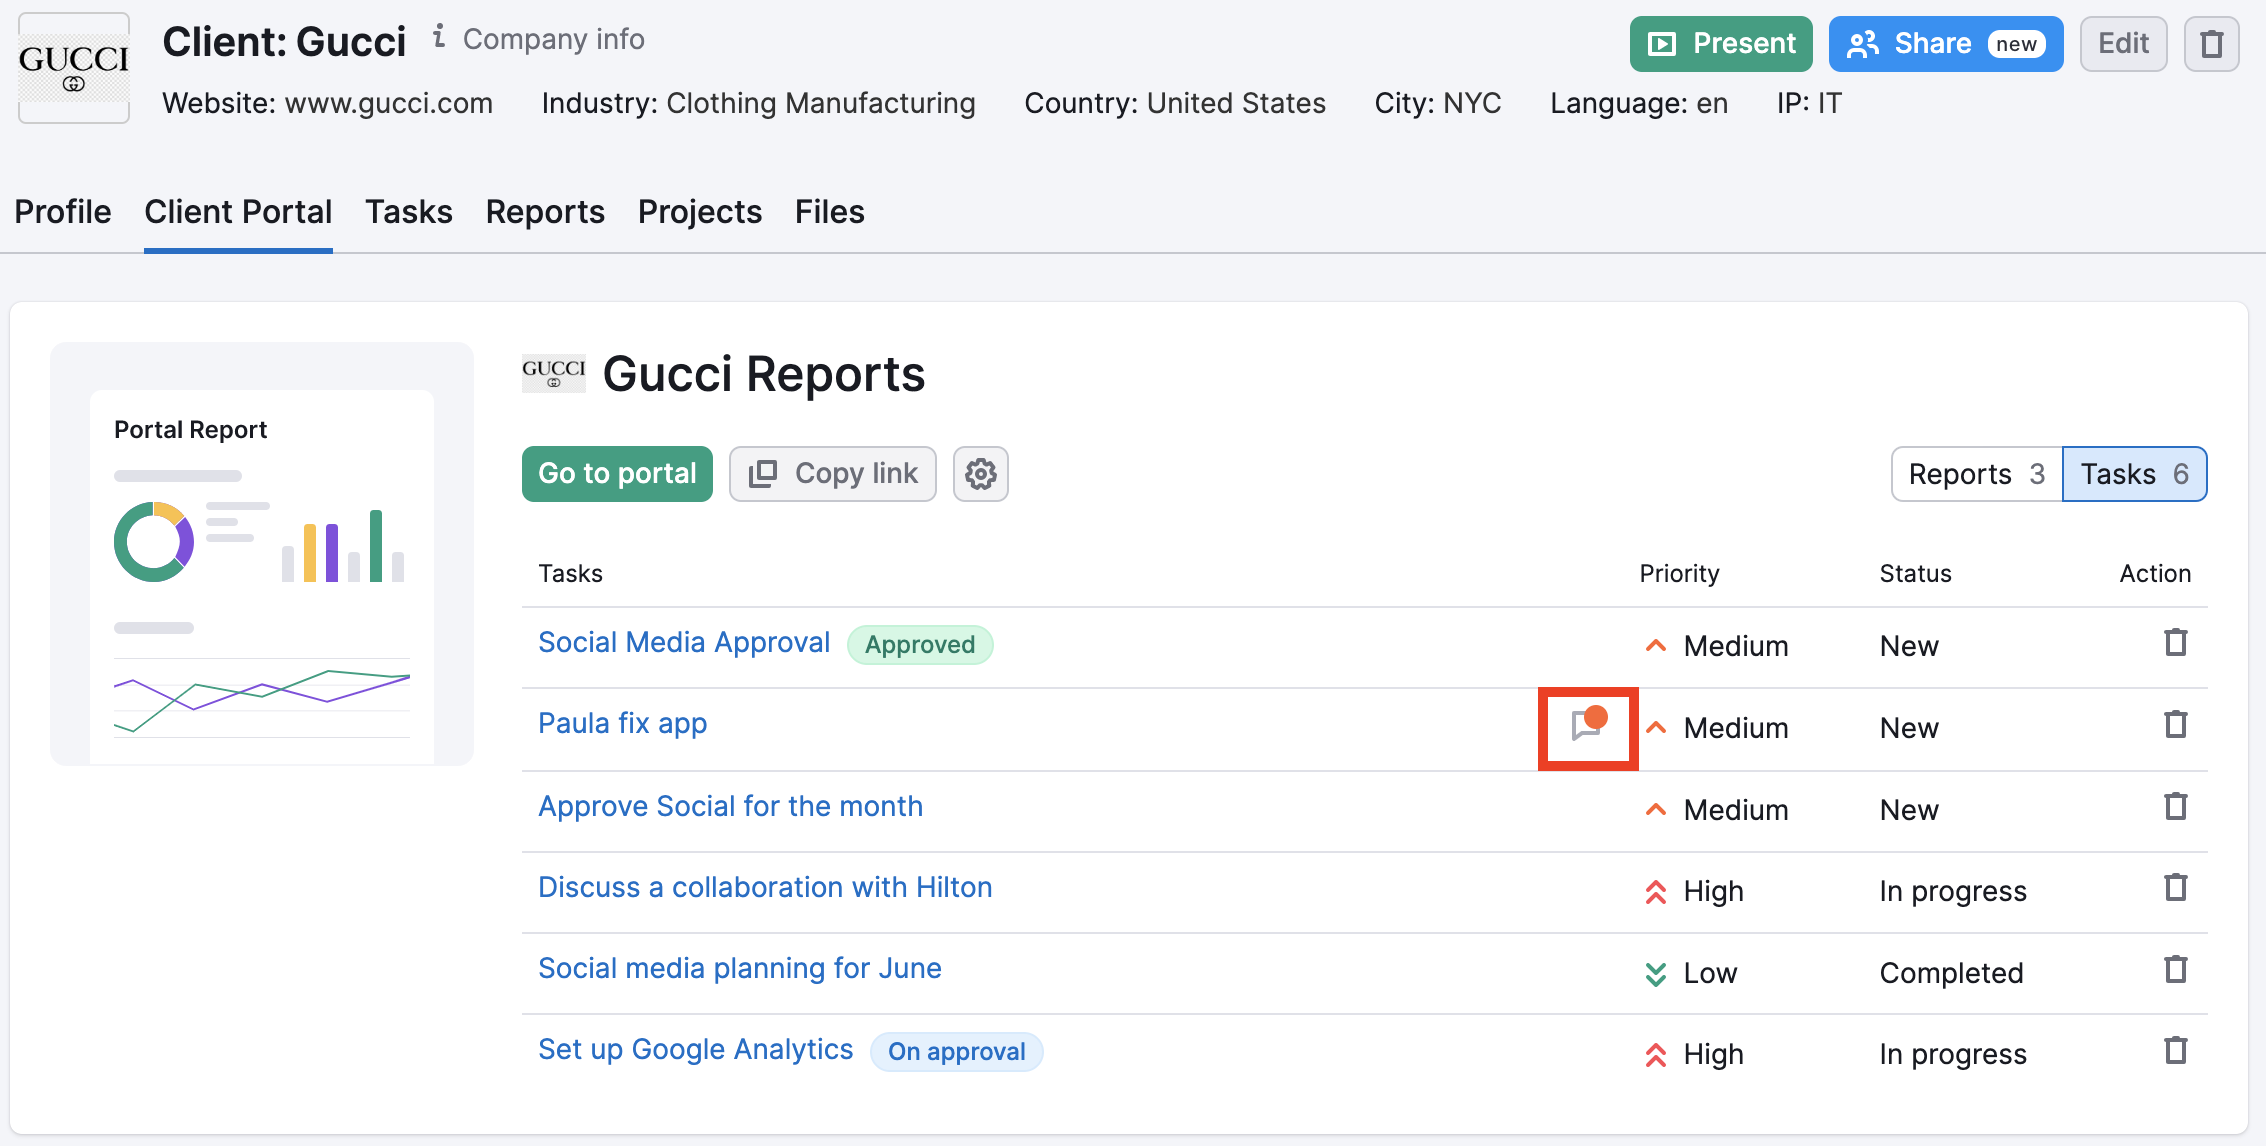
Finally, you can also upload relevant files and documents to the portal. These files are stored securely and are only accessible to you and the client.
Lead enrichment allows you to evaluate potential clients in greater depth, so that you can focus on the most promising leads and create more informed proposals.
When you create a new client profile, you can access key technical information about the client (through our Wappalyzer integration). This includes:
- Programming language(s)
- UI frameworks
- Font scripts
- Metadata
- Security parameters
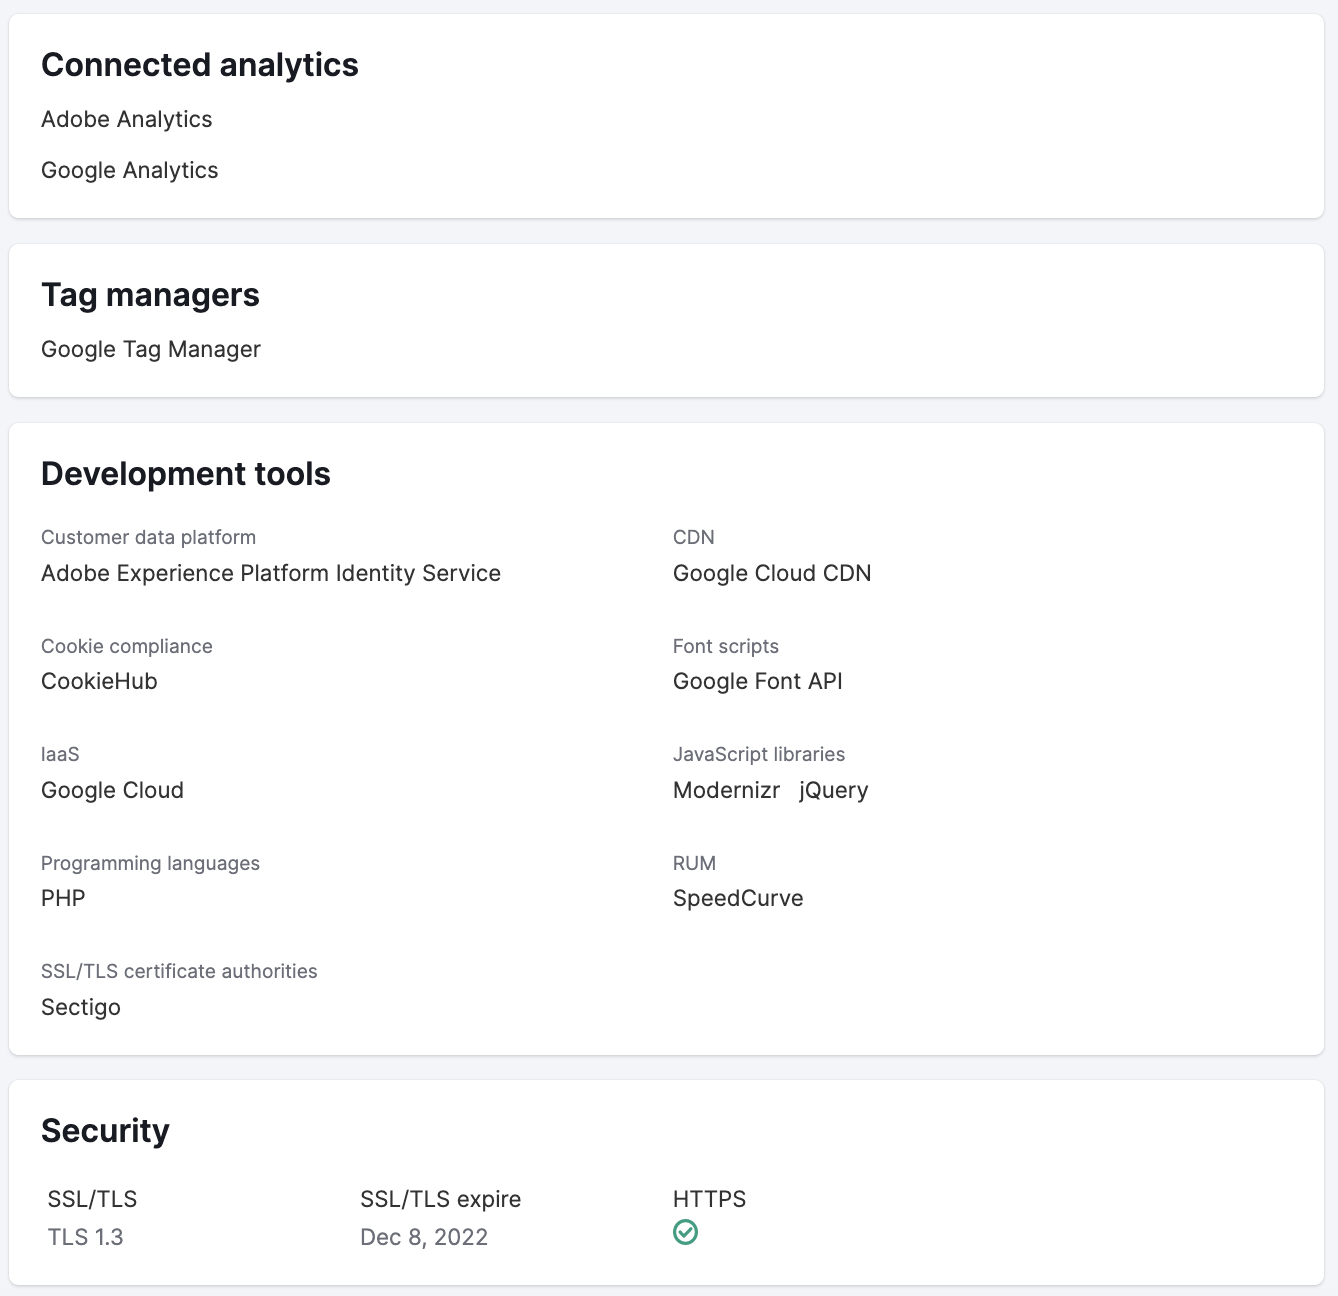
You can also get easy access to useful company information, such as mission, size, and year founded. All of this information can help you to identify suitable opportunities, find recommendations for improvements, and customize your proposals and pitches.
In addition, Agency Growth Kit users can access important company details, such as:
- In-depth contact information (telephone numbers, Skype handles, emails, etc.)
- Social media profiles
- IP addresses
- Supported languages
- Connected analytics tools, trackers, CRMs, advertising platforms, tag managers, and retargeting tools

Files is a dedicated file storage feature inside Semrush. It helps you organize your files in the most popular formats in the client card so that you have all your customer-related information in one place.
This allows you to conveniently attach data from various tools along with task requirement files, NDAs, agreements, and any other type of client file you regularly work with.
To start using the feature, open the Files tab in the client’s card.
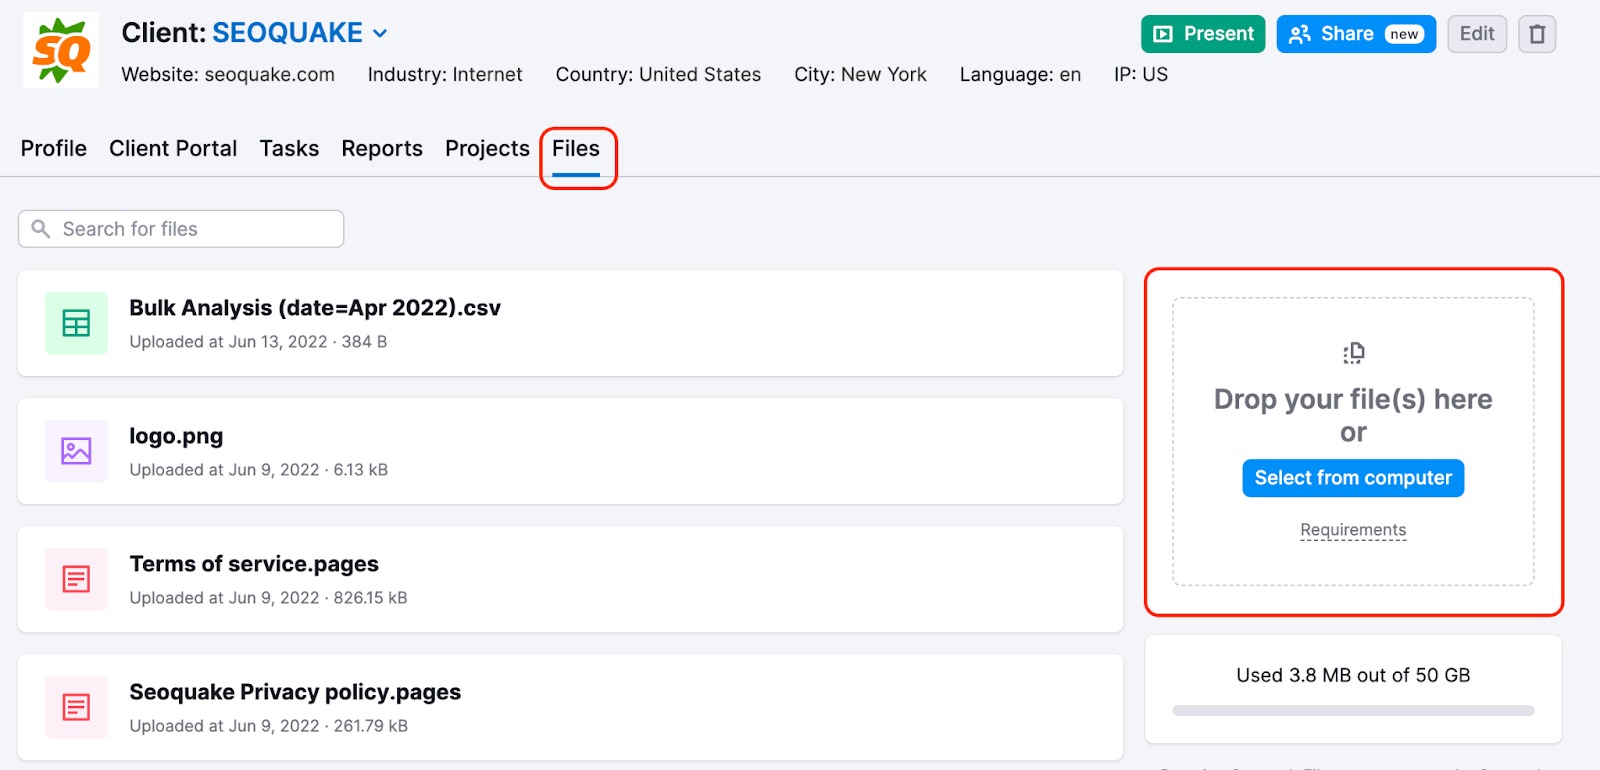
Please note that Agency Growth Kit users have access to 50GB of storage capacity. All other users have access to 200MB of capacity by default.
CRM supports all popular file formats, including JPEG, JPG, TIFF, GIF, PNG, MPEG, MP4, PDF, CSV, XLS, XLSX, DOCS, PAGES, PPT, PPTX, KEYNOTE, KEY, TXT, and ICOf.
SVG, RAR, and ZIP formats are not supported.
You can download, rename, and delete stored files. The search bar can help you to locate specific files, while the progress bar shows how much space you have left.
All files are securely stored in the Google Cloud Platform by Semrush.
Present Mode is a live presentation feature that allows you to show your work to your clients safely and securely (or to pitch to potential clients).
Please note that Present Mode is only available as part of the Agency Growth Kit.
To get started, select your client and then click the “Present” button in the top right corner.
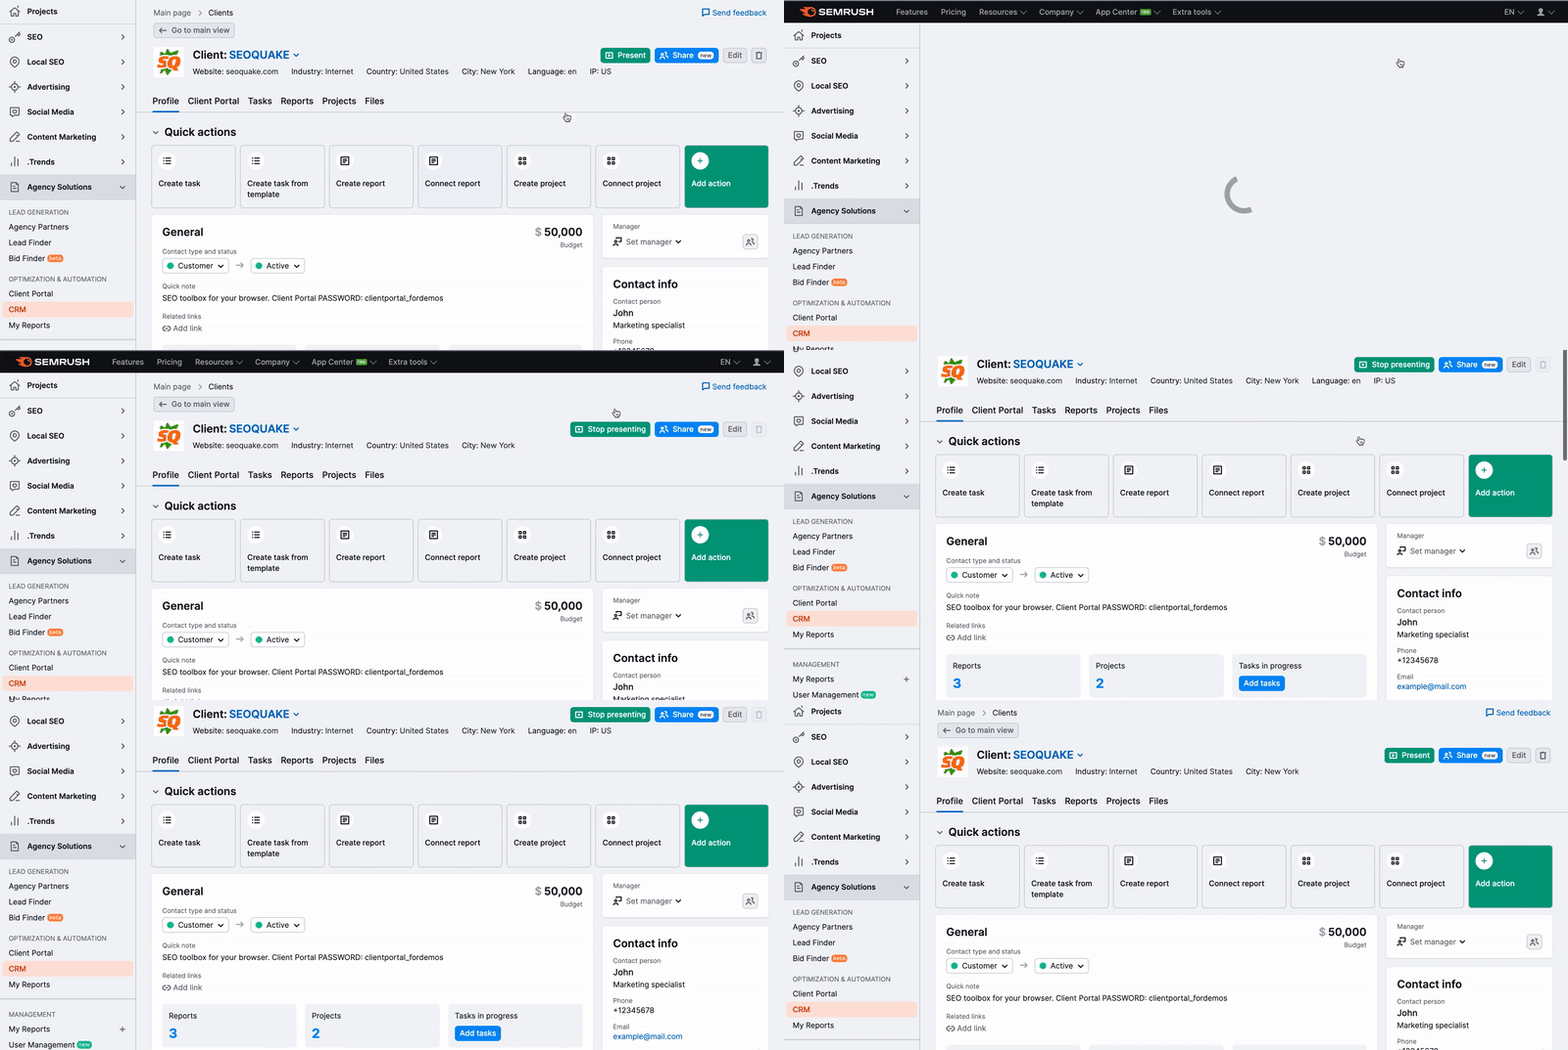
While active, Present Mode will hide all other clients from view, as well as other projects not associated with that client. That means you can safely use the Semrush interface to present without worrying about disclosing data from other clients.
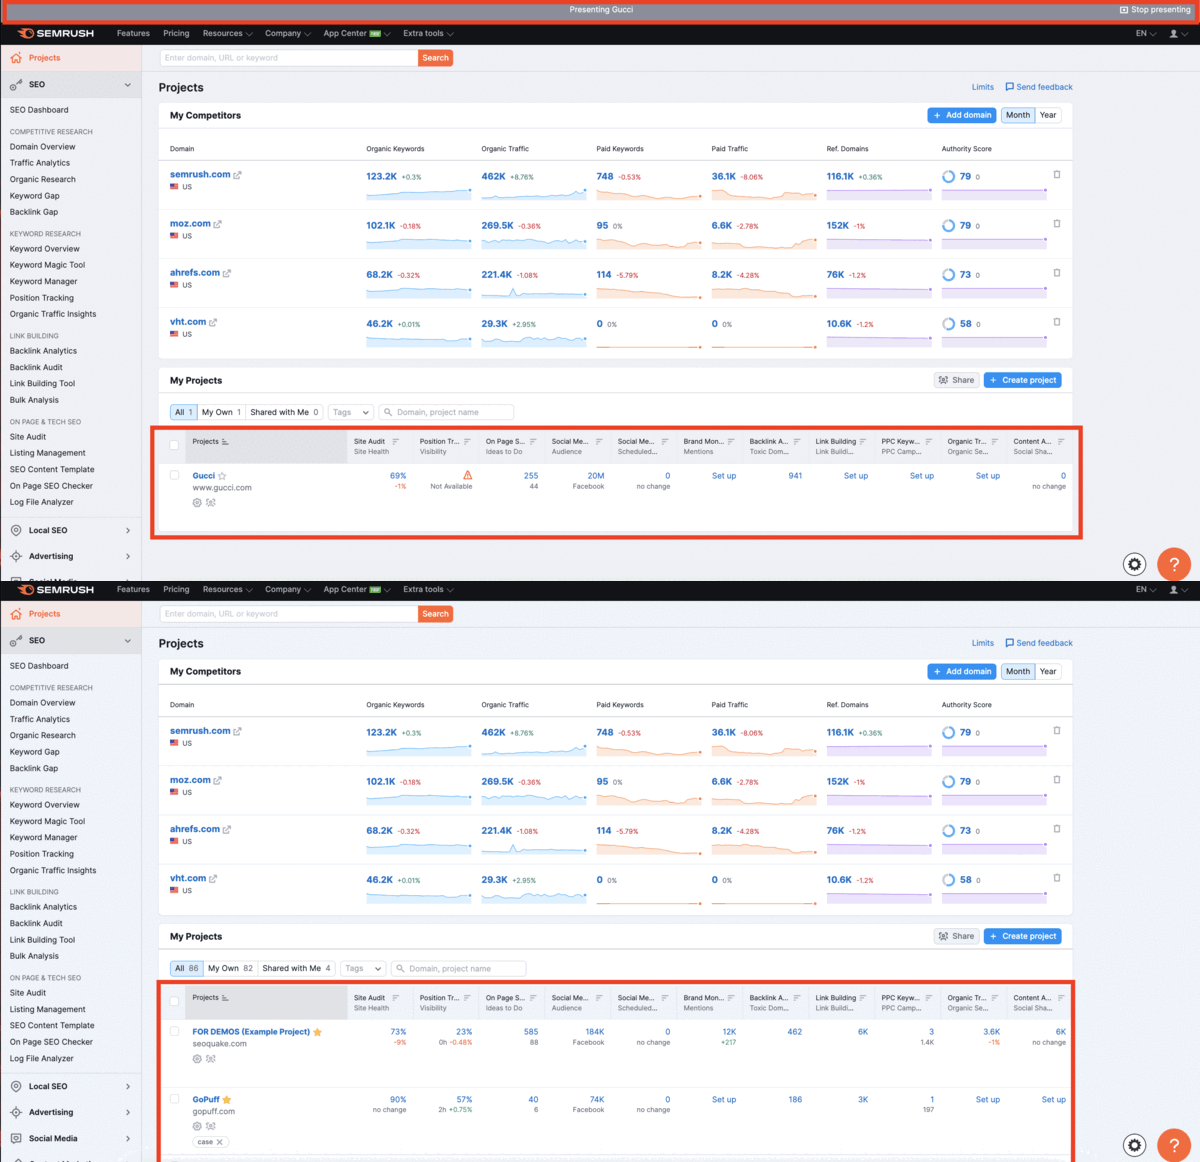
When Present Mode is active, the bar at the top of the screen will be gray. You can exit this mode any time by clicking “Stop presenting” in the gray bar (or in the client’s profile).
This feature allows you to share clients’ or leads’ profiles.
This provides opportunities for collaboration between team members, helps with distributing workload efficiently, and attracts more resources for certain tasks.
How client sharing works:
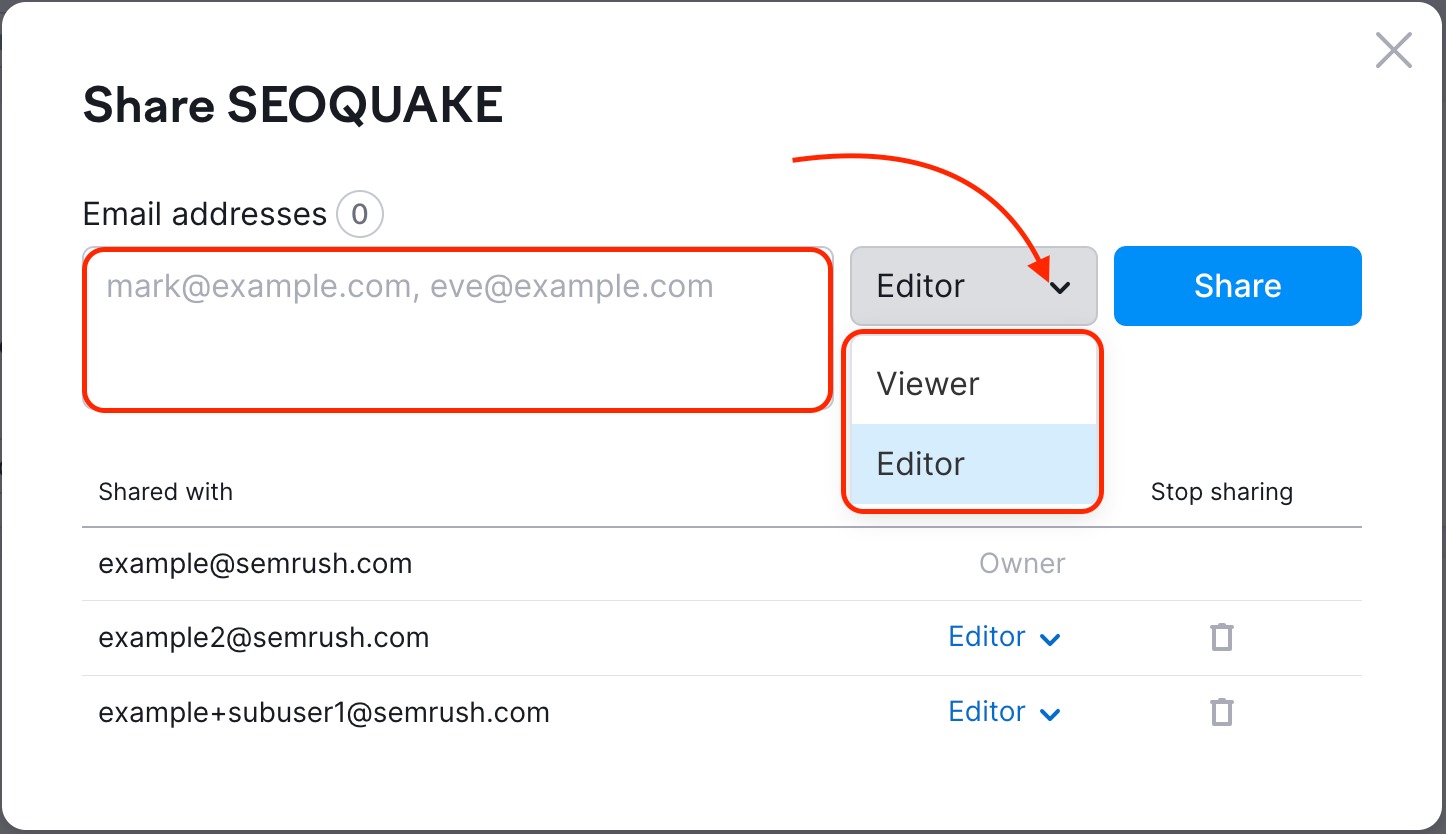
- All paid users can share clients with “Viewer” access with any, even free users. All the data will be available for view without the option to edit the shared client in any way or re-share it.
- All paid users can share clients with “Editor” access with any, even free users. They will be able to edit any data there. Paid users with “Editor” access will also be able to re-share the client. Free users with “Editor” access will not be able to re-share the client.
Please note: client sharing is currently only available for paid users.
To share a client, simply click on the share button in the bottom right corner of the client card.
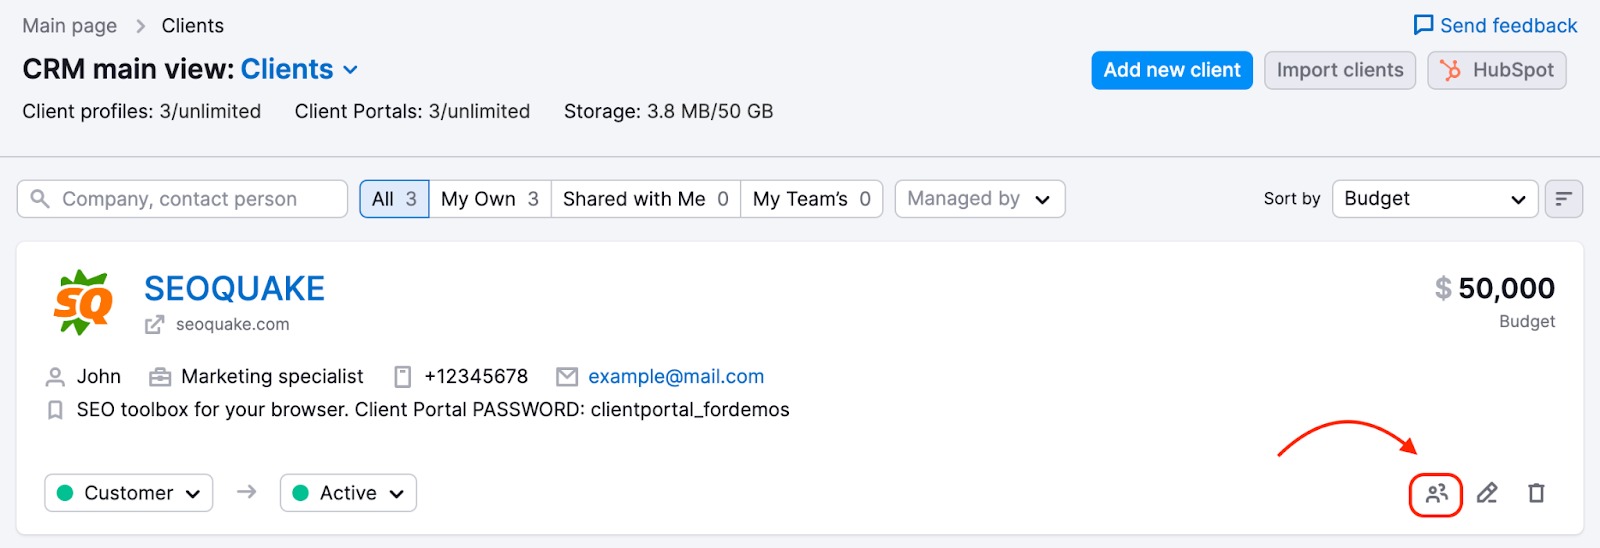
Next type in the email of the person you would like to share the client with. Then select viewer or editor access and press the share button.
This feature allows you to share reports within CRM. Allowing full access to a shared client - with all the linked entities, such as tasks, projects, reports, files, etc.
Reports can be linked to clients as well as to Client Portal and can be shared with other team members from Client Reports and from Client Portal.
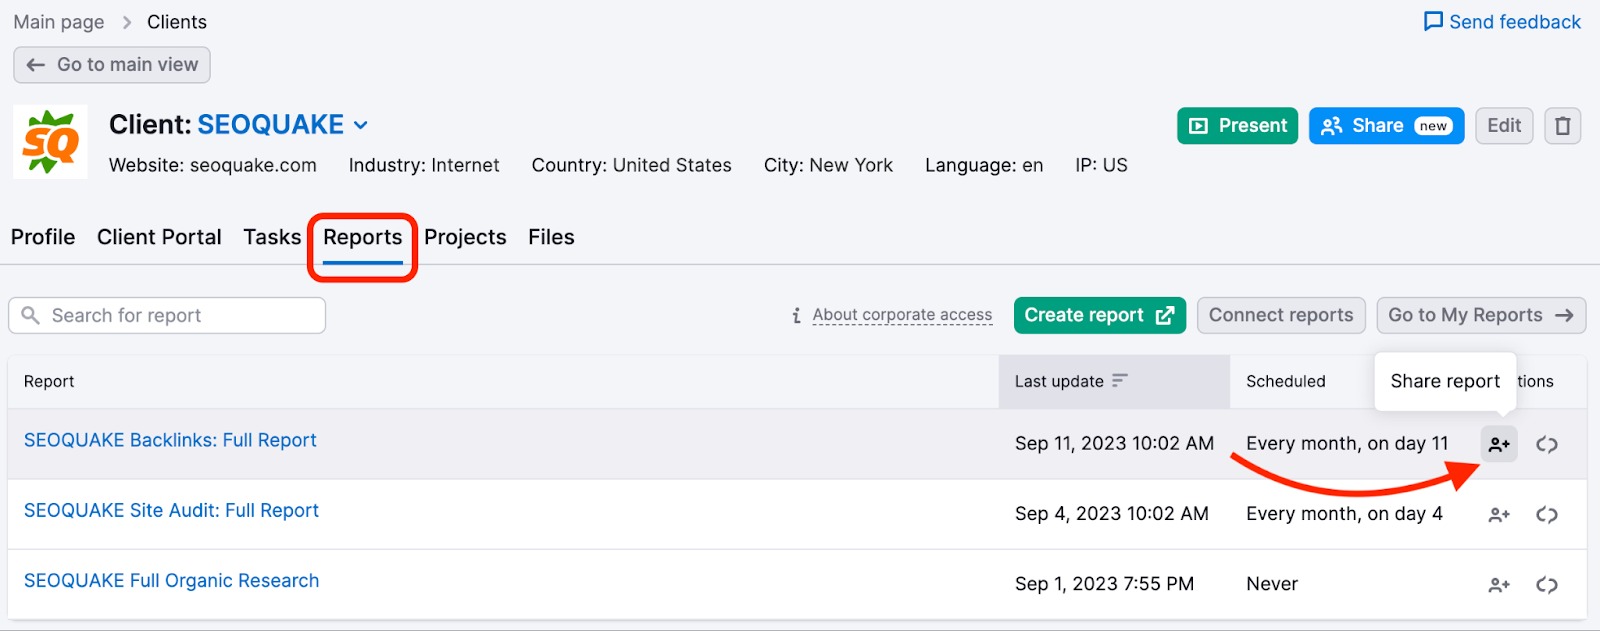
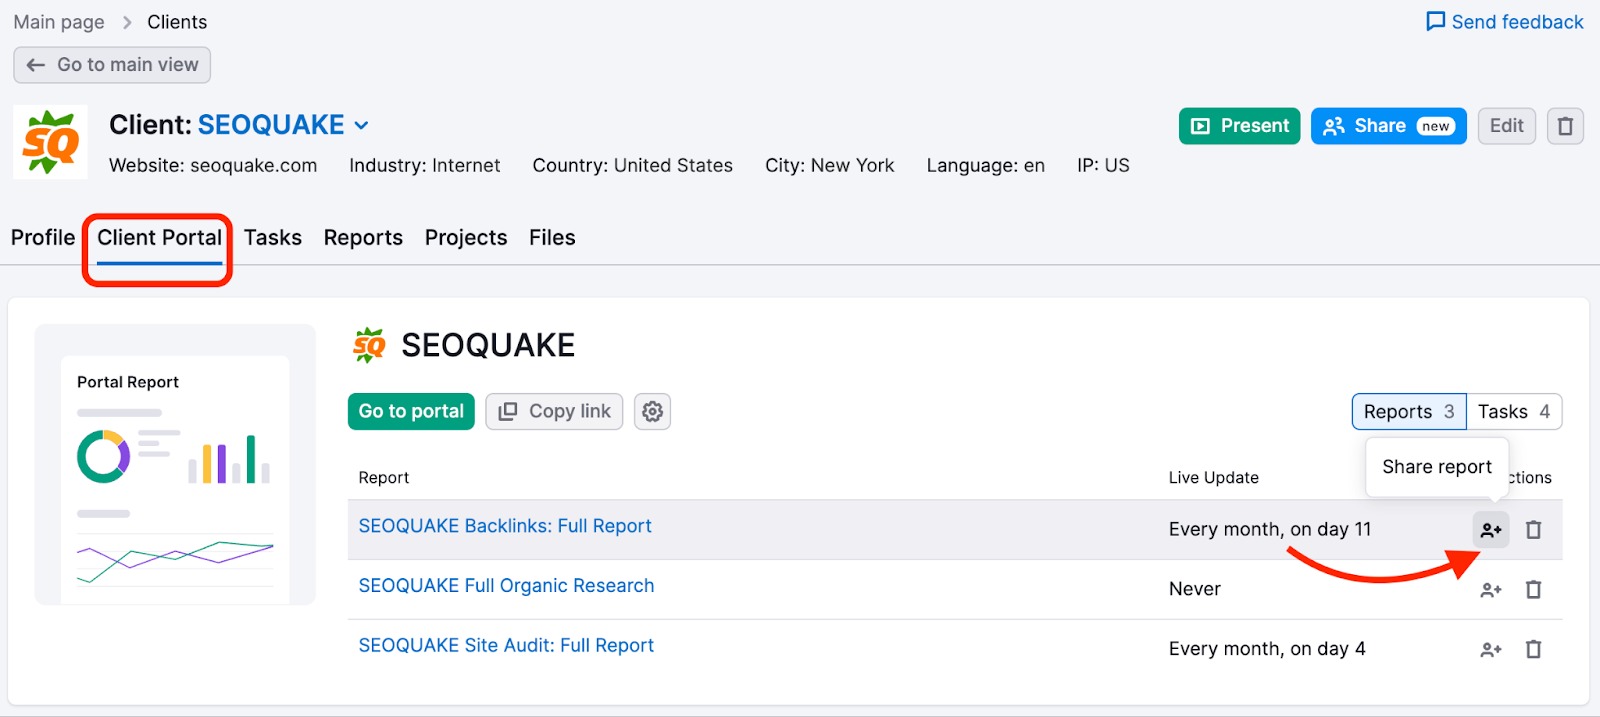
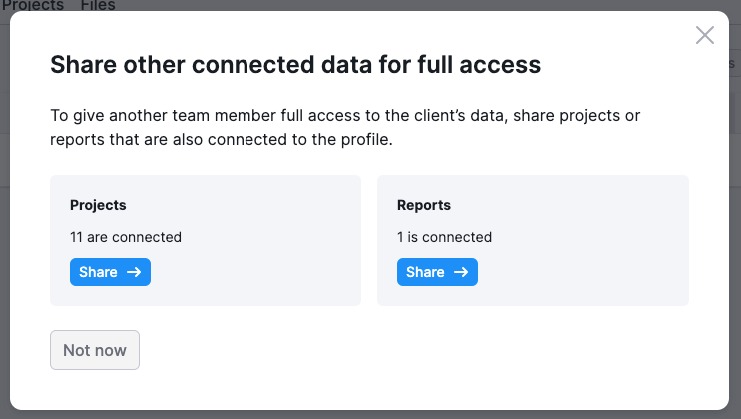
If a client containing a report is shared, there’s a suggestion to share the report too, and vice versa.
To learn more about the importance of CRM for marketing agencies—and to get some key insights into improving your agency-client relationships—check out our dedicated guide.
Frequently Asked Questions
Here are some FAQs about the CRM tool.
CRM does not cost anything and is available to use as a free tool. However, with an Agency Growth Kit subscription, you also get additional key features and limits, such as:
- Access to Client Portal
- Access to Present Mode
- Unlimited client cards (free users are limited to 10)
- 50GB of storage in Files (free users are limited to 200MB)
- Increased company details and data
The Agency Growth Kit is a tailored Semrush add-on for agencies. It can help you improve your agency’s performance and increase your growth potential.
It allows you to:
- Generate new inbound leads
- Find high-revenue contract opportunities
- Automate your client reporting
- Enhance your agency-client relationships
- Optimize your client and project management workflows
- Strengthen your brand
As well as full access to all features in CRM, including Client Portal, the Agency Growth Kit includes:
- The Agency Partners platform
- Branded, white-label, customized reports in My Reports